


Formulas stand out as one of SmartSuite's most powerful features. They empower you to reference other fields, create conditional statements, and perform operations, allowing you to make the most of your content in creative and innovative ways.
To give you a clear picture, let's consider using SmartSuite for project management. While SmartSuite makes it easy to list tasks, set due dates, and tag stakeholders, the real magic happens when you bring SmartSuite formulas into the mix.
With SmartSuite formulas, you can achieve a variety of tasks, including:
- Calculating the days between dates.
- Summing costs and income.
- Concatenating text and arrays.
- Counting records that match specific conditions.
- Creating scores based on answers to a quiz or assessment.
And that's just the beginning. Before we dive into specific examples, let's explore how SmartSuite formulas work and what you need to know to get started with them, so you can take full advantage of this powerful tool.
IF and CASE
We’ll start with the powerhouse of a function IF() and its companion function CASE() to dive right into logical evaluation in your formulas. IF() lets you specify a logical statement along with the output that should be produced for true and false evaluations of that statement.
The syntax of an IF() function is simple:
IF (condition, value if true, value if false)
An example:
IF ( [Status] = “Complete”, “Completed”, “In Progress” )
Here is the really powerful part: you can nest if statements like this:
IF(
[Period] == "Monthly", DATEADD( [Subscription Start], 1, "months" ),
IF(
[Period] == "Yearly", DATEADD( [Subscription Start], 1, "years"),
IF(
[Period] == "Quarterly", DATEADD( [Subscription Start], 3, "months"),
IF(
[Period] == "One Time", [Subscription Start], NOW() ) ) )
)
CASE() is a variant of this, allowing you to specify a condition value - and then a list of potentially matching values and the output to generate if the value matches the condition value. Sounds complex, but in practice it really isn’t.
Here is an example (notice that parts of the function are on different lines for readability - this does not affect the operation of the function):
CASE([Status],
"Backlog","Not Started",
"In Process","Working on it",
"Ready for Review","Working on it",
"Complete","Done"
)
AND and OR
Now that we’ve got an idea of how to control the logical flow of a formula, let’s step it up another notch with the AND() and OR() functions. You can use these to group conditions that should be evaluated together - either requiring all of the statements to be true (AND) or any of them to be true (OR).
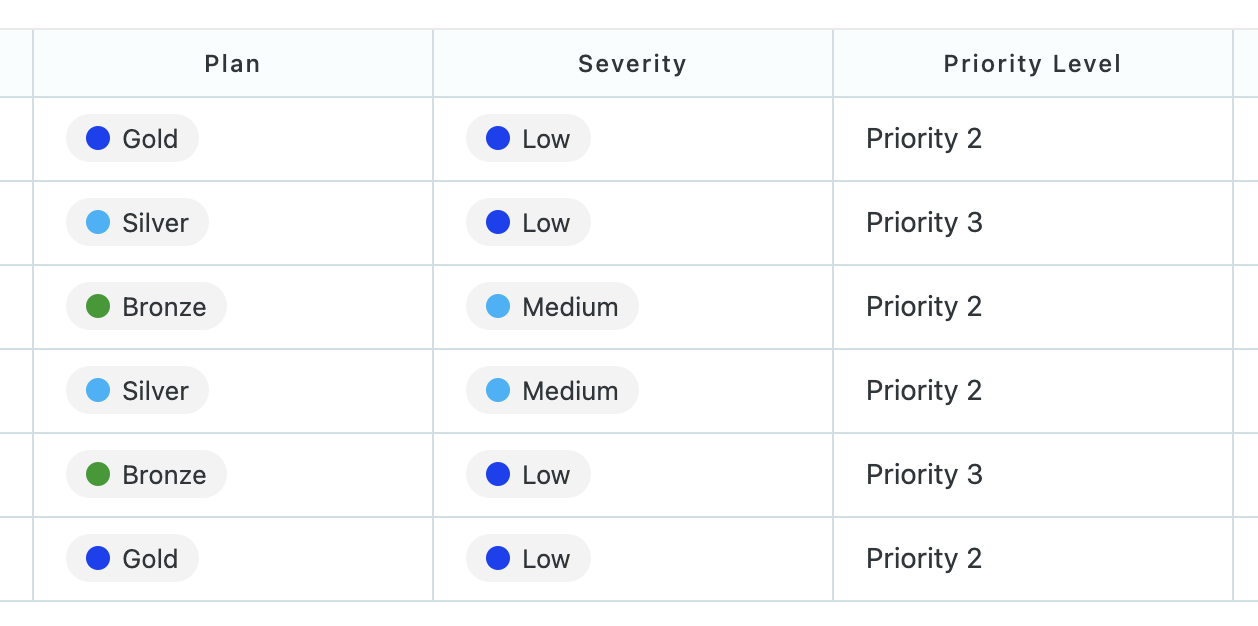
You can also nest these statements to create more complex evaluations. Here is an example, where I use AND and OR together to figure out the priority level of a customer support ticket:
IF([Severity]=="High","Priority 1",
IF(
AND([Severity]=="Medium",[Plan]=="Gold"),
"Priority 1",
IF(
AND([Severity]="Medium",OR([Plan]=="Silver",[Plan]=="Bronze")),
"Priority 2",
IF([Plan]=="Gold","Priority 2","Priority 3")
)
)
)
ARRAYJOIN and ARRAYUNIQUE
So far we’ve worked with text, dates and list field types, but many times you’re working with arrays of values. With the Linked Record field type you could attach many records, so how do you work with those values?
ARRAYJOIN and ARRAYUNIQUE functions are purpose-made for this, allowing you to concatenate multiple values into a list with a specified separator. The only difference is ARRAYJOIN() gets all of the linked values, while ARRAYUNIQUE gives you a list of the unique items in the list.
Finally, you can optionally specify the number of items you want to return as a third argument to the function.
Examples:
ARRAYJOIN([Link to Employees].[Status], " ,")
ARRAYJOIN([Link to Employees].[Status], " ,", 10)
ARRAYUNIQUE([Link to Employees].[Email],", ")

CONCAT
SmartSuite’s CONCAT() function allows you to join together arguments to create a single text value. If you want to specify static text, the function fully supports it - just make sure you enclose your text in double quotes - i.e. “*” or “My Value” for example.
The really interesting thing is that you aren’t limited to just text type fields - you can include the “stringified” values of other field types like numbers, dates and formulas. You can also embed other functions as arguments, and the string version of their outputs will be concatenated.
The syntax is straightforward, allowing you to specify one or more arguments that will be combined in the text output.
CONCAT(text, [text2, …])
Here are a few examples and their outputs, using the following field values:

- CONCAT([Status], " ", [Due Date], " ", [Number]) → Backlog Sep 19 123
- CONCAT(([Number] / 10), " ", [Auto Number]) → 12.30 #001
COUNT and COUNTIF
The COUNT() function allows you to essentially mimic the function of SmartSuite’s Count field type, with the flexibility to include the result in a more complex calculation to produce the result you’re looking for.
For example, you could embed a COUNT function in a CONCAT to produce text that describes the value, like this:
- CONCAT(COUNT([Tasks]), “ total assigned tasks”)
Where this function really gets interesting is in its COUNTIF form. This function extends the functionality of the simple COUNT with a conditional evaluation, allowing you to count only those items that meet your specified criteria.
In this example, we’ll combine COUNT and COUNTIF to find the percentage of tasks that have a “Complete” status:
- (COUNTIF([Tasks].[Status]=="Complete", [Tasks]) / COUNT([Tasks]))*100
It’s important to point out here that Formulas have a “type.” In this case, we output a number, something like 33.33 or whatever the calculation arrives at. You could absolutely enclose that formula in a CONCAT to add formatting, a percentage sign and so on - but then the field will be treated and interpreted as text.
By outputting a number, we can re-use this value in other calculations, use it in numeric conditional requirements for automations, and so on. (Note that we are planning to add formatting capabilities to formula fields in the near future so you could display this value with a percentage sign).
LEFT and RIGHT
The LEFT() and RIGHT() formulas provide you with the ability to extract characters from a string, giving you the choice to start extracting from the beginning (left) or from the end (right).
LEFT( Text, Characters )
RIGHT( Text, Characters )
Here’s an example:
RIGHT( [Social Security Number], 4 ) => Outputs the last 4 digits of the number in the “Social Security Number” field - you could use this in conjunction with field-level permissions to show the “Last 4” field and hide the source field from everyone outside of the HR Team.
LENGTH
Just like the functions we discussed earlier, LENGTH() is used to determine the length of a string. Its syntax is simple:
LENGTH(string)
For instance: LENGTH([Post Content]) => 12
You might wonder why you'd want to know the length of a string. As it happens, this information can be quite handy in various situations, such as:
- Determining if text content is of suitable length for a particular marketing post, such as posts to X or Facebook
- Calculating the length of a dynamic term used in a LEFT or RIGHT function
- Validating that a product code is the correct length (i.e. always 8 characters or whatever the requirement is)
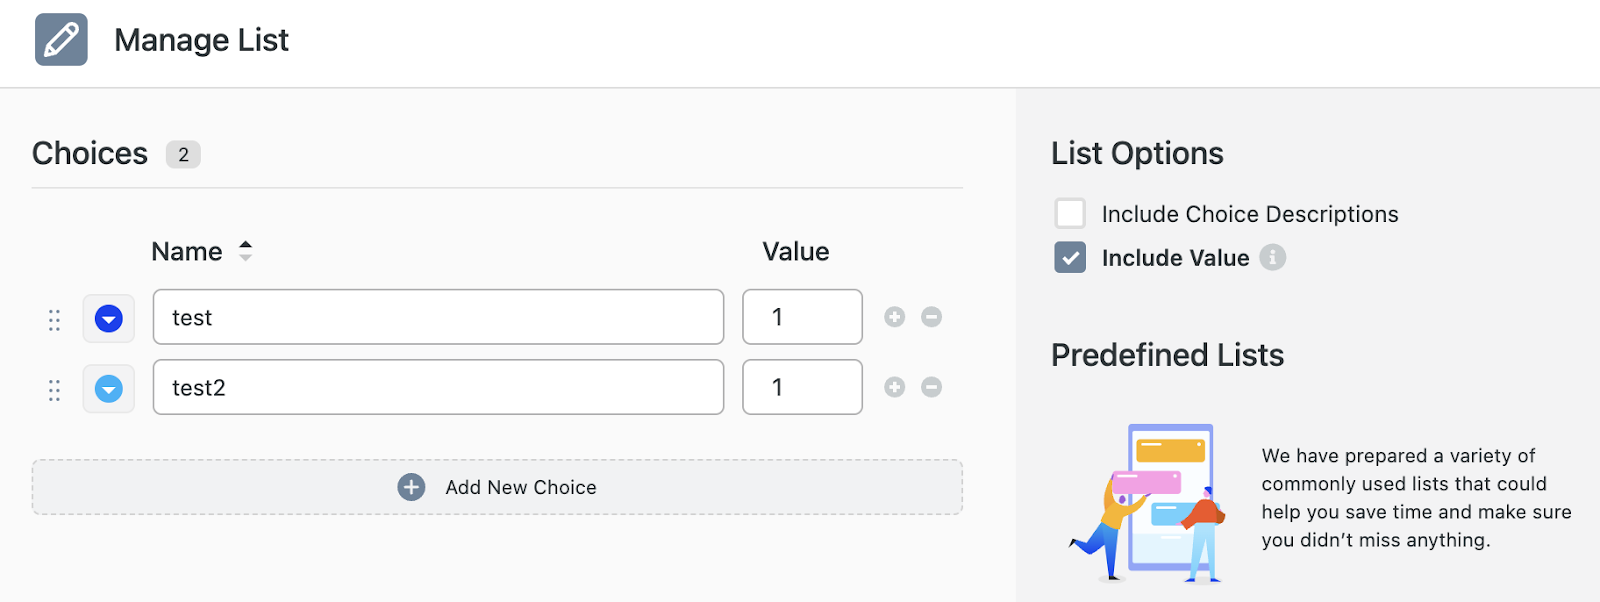
NUMERICVALUE
You can use SmartSuite formulas to calculate a score based on user selections in a record. This can be really powerful if you’re putting together a risk assessment, grading a student’s submission, or evaluating your department’s performance.
Let’s take the risk assessment use case as an example. I could have several questions that receive a Yes, No or Not applicable response - with each response choice having a number value that is used in a scoring calculation. The problem here is that doing this with an IF statement would take a lot of work, since you would have to evaluate each potential response for each field.
That’s where NUMERICVALUE() comes into play - you can get the number value assigned to each item and use that number directly, avoiding the lengthy conditional statements. (Numeric values are an option in Single Select and Multiple Select fields - expand the choices section in field properties and check the Include Value checkbox).
Even a long list of fields can be evaluated this way. Your risk score might look something like this (pro tip - generate this type of patterned calculation using a spreadsheet and paste it into the formula configuration UI):
NUMERICVALUE([DCH-09]) + NUMERICVALUE([DCH-13]) + NUMERICVALUE([DCH-15]) + NUMERICVALUE([END-04]) + NUMERICVALUE([END-04.1]) + NUMERICVALUE([END-04.7]) + NUMERICVALUE([IAC-02]) + NUMERICVALUE([IAC-15]) + NUMERICVALUE([IAC-20]) + NUMERICVALUE([NET-03]) + NUMERICVALUE([NET-06]) + NUMERICVALUE([PES-02]) + NUMERICVALUE([PES-03]) + NUMERICVALUE([PES-03.3]) + NUMERICVALUE([PES-06]) + NUMERICVALUE([PES-06.3]) + NUMERICVALUE([VPM-01])
Another (simpler) example - evaluating employee performance based on the average of ratings in three categories:
AVG(
NUMERICVALUE([On Time Performance]),
NUMERICVALUE([Quality]),
NUMERICVALUE([Customer Service])
)
RECORD_ID
The RECORD_ID() function does what you probably would expect - outputs the unique identifier for the current record. While this isn’t particularly useful for a human reader of the record content, it’s really handy for integrations and data import.
One of the most powerful ways to use this function is to combine it with the Button field type to create a webhook URL. For example:
CONCAT("https://my.webhook.com/?id=", RECORD_ID())
With this formula you can append the record ID of the associated record to the webhook URL, allowing you to identify and take action on the record in an external system like Make.com or Zapier.
DATEDIFF and WORKDAYS_DIFF
The DATEDIFF and WORKDAYSP_DIFF functions allow you to calculate the distances between dates, which is incredibly useful in your workflows to determine days remaining in a project, total hours worked and similar stats.
DATEDIFF() returns the amount of time between two dates, and WORKDAYS_DIFF additionally factors in your Workspace-defined working days and holidays when calculating the value.
With DATEDIFF() you can specify which unit of time you want the result returned in. Supported units include:
- minutes
- hours
- days
- weeks
- months (uses 30 days for calculation)
- years
The syntax looks like this:
DATEDIFF( Date1, Date2, Unit )
The WORKDAYS_DIFF() function always returns “days” as the unit of measurement, and has the following syntax:
WORKDAYS_DIFF([Start Date], [Target Completion])
In conclusion, SmartSuite's formula capabilities are a game-changer for project management. They empower you to take control of your data, automate complex calculations, and bring a new level of dynamism to your content. With the ability to create, calculate, and innovate at your fingertips, you're well-equipped to tackle the challenges of modern project management with confidence. So why wait? Dive into the world of SmartSuite formulas and unlock the full potential of your projects today. Your journey to greater productivity and innovation starts now!

SmartSuite provides work platform for standardizing workflows in the following areas:
- Governance, Risk & Compliance
- IT & Service Ops
- Project / Portfolio Management
- Business Operations


