


10 SmartSuite Formulas
Formulas are a powerful tool in SmartSuite that can unlock new possibilities for managing and analyzing your data. They allow you to reference other fields, set conditions, and make the most of the information in your Apps. Even if you don't plan on becoming an expert in database management, learning a few of the most frequently used formulas for no-code automation can help you extract more value from your Solutions.
Some common use cases include:
- Data validation: Use formulas to ensure that data entered into a field meets certain criteria, such as being a valid date or being within a certain range.
- Data calculations: Use formulas to perform calculations on data in your table, such as summing up values in linked records or calculating the average of a group of fields.
- Text manipulation: Use formulas to manipulate text, such as concatenating the values of multiple fields into one, or converting text to uppercase or lowercase.
- Data Lookup: Use Formulas to pull data from Apps in your SmartSuite Solution based on a match between field values.
- Combining data: Use formulas to combine data from multiple Apps (very much like what you can do with Lookup fields, but with the ability to manipulate the data being returned).
- Automating processes: Use formulas to automate processes that would otherwise be time-consuming to do manually, such as updating a field when another field changes.
- Conditional logic: Use formulas to implement complex logic by using the IF, AND, OR, NOT functions which allows conditions based on the value of certain fields.
These are just a few examples of the many ways that formulas can be used in SmartSuite to enhance your workflow and streamline your data management. Let’s take a look at the top ten functions and how to configure them.
SUM()
Syntax: SUM( Number1, Number2, ... ) OR SUM( [Linked Record].[Field] )
You can use the SUM function to return the sum of a series of numbers. What is really powerful about this function is that it can do that for numbers in linked records.
This capability is useful in a variety of situations. If your project records are linked to a tasks App and each task has a “total hours” field, you can get the total hours for all tasks with the SUM function. Let’s explore how to use it.
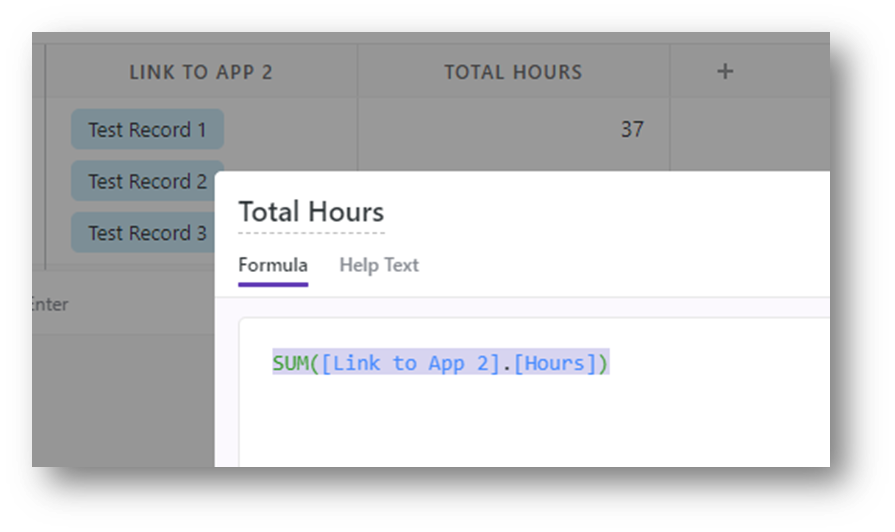
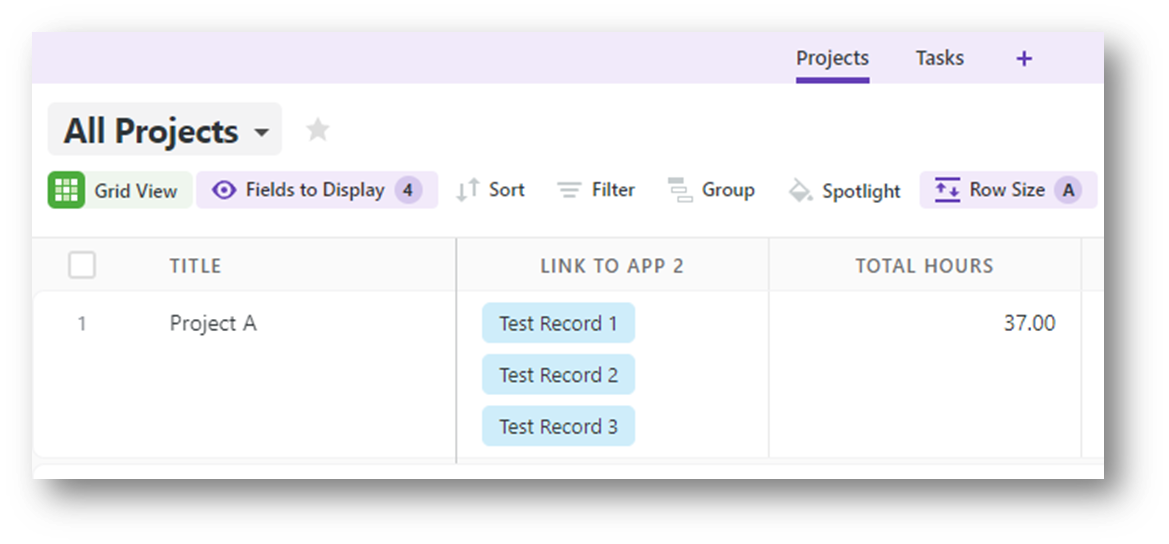
Example 1:
Let’s use a SUM to calculate the total hours mentioned in the use case above. We have a Projects App that is Linked to a Tasks app, and Tasks contains a field called Hours.
We can add the following formula to the Projects app to do this:
SUM([Link to App 2].[Hours])
It looks like this:
It’s worth mentioning here that you could also use a Time Tracking Log field instead of a Number field. Time Tracking Log allows you to input time values in hours and minutes, but when they’re used in formulas they return a number. That number is the total number of seconds tracked in the field, so to get hours we have to do a little math.
We’ll grab that value and divide by 3600 to turn it into hours:
SUM([Link to App 2].[Time Tracking Log])/3600
SUMIF()
Syntax:SUMIF(Criteria, [Linked Record].[Number1])
The SUM function works great if you just need to aggregate all of the values in linked records, but maybe you just want the sum of hours in your tasks app where the task has been marked complete. Enter SUMIF and the ability to conditionally sum values.
SUMIF takes two parameters - a condition to evaluate and then the field you want to sum.
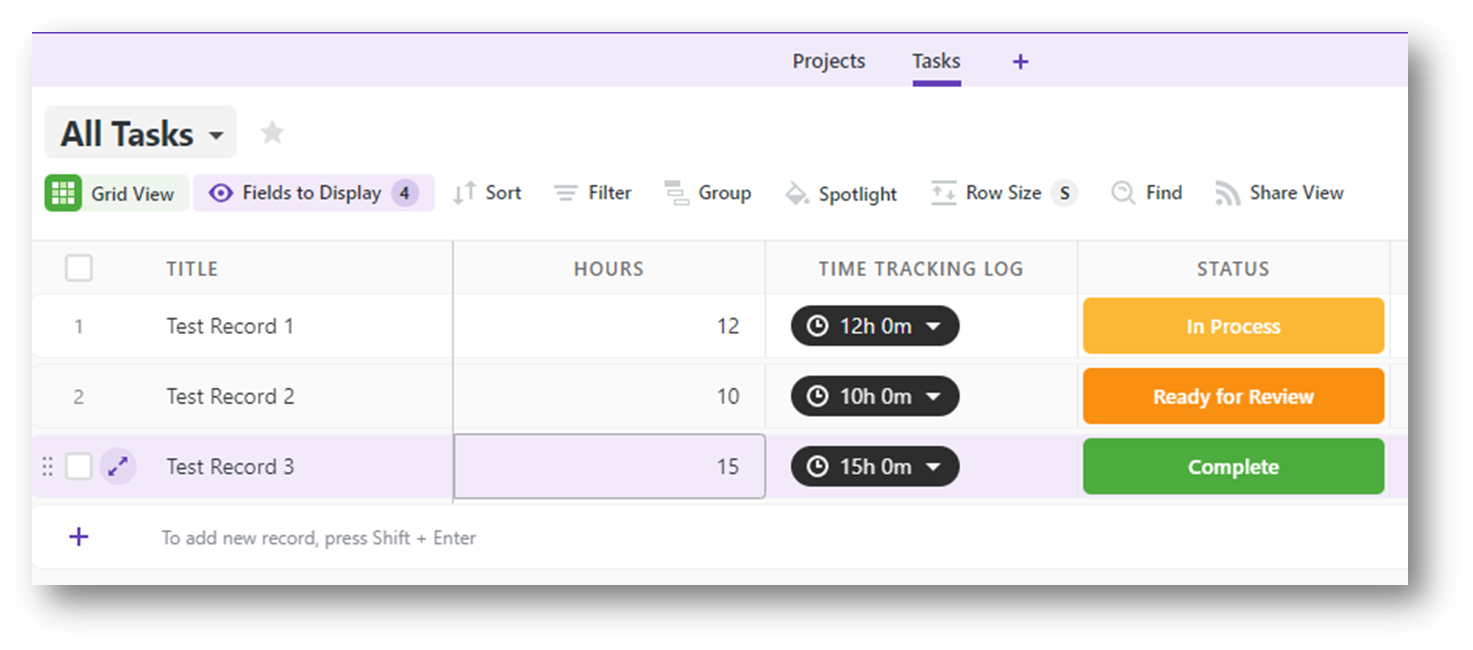
Example 2:
We can revisit our prior SUM example and see how easy it is to only sum Hours values for Task records that are in a “Complete” status. First, let’s make sure our Tasks app has records in both complete and incomplete statuses, like this:
With that data ready, we can add the following formula to our Projects App:
SUMIF([Link to App 2].[Status] == "Complete", [Link to App 2].[Hours])
Now you’ll see that our new field is showing a different value from the SUM formula that we previously created.

COUNTIF()
Syntax: COUNTIF(Criteria, [Linked Record Field]) or COUNTIF(Criteria, [Sub-Item Field])
We’ve just learned how to conditionally sum numeric values, but what if you just need the count of records that match a condition? The COUNTIF function serves that purpose, giving us a count of the items in a linked record or sub-item field that match specified criteria.
Example 3:
Using the same sample Apps, add the following formula to Projects:
COUNTIF([Link to App 2].[Status] != "Complete", [Link to App 2])
We see that the field counts only those records with a status that does not equal “Complete” (using the != operator)

IF()
Syntax: IF(Criteria, Value if True, Value if False)
IF() is a versatile formula in SmartSuite that allows for no-code automations by responding to logical expressions. It returns value1 when the specified argument is true, and value2 when it's false. This makes it an essential tool for sorting and organizing data based on specific conditions without the need for manual filtering.
It also helps in creating expressions when combined with other formulas, this helps in triggering calculations based on the input matching certain conditions or criteria.
Important Tip: IF functions must return the same type of data (text, a date or a number) for both the true and false results. In other words, you can’t have IF return the number 1 if true but return “no value found” if false.
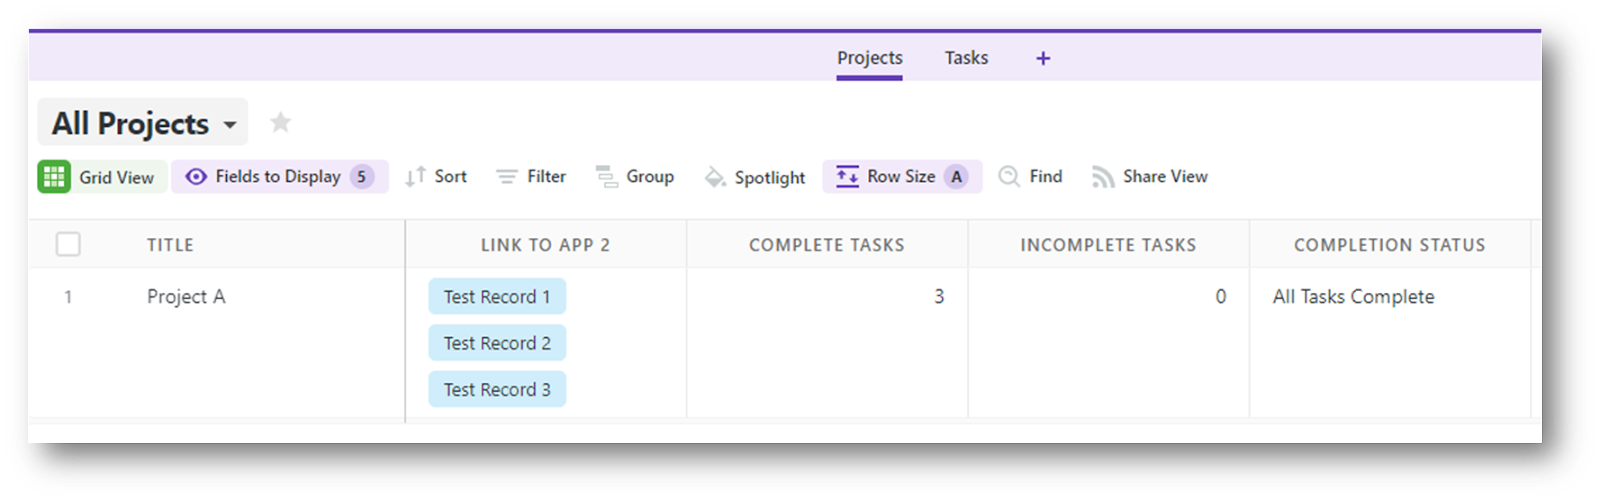
Example 4:
In this example, I’ll show you how you can use the result of one formula in another formula. First, let’s create a Formula field “Complete Tasks” that gives us the count of completed tasks, using this formula:
COUNTIF([Link to App 2].[Status] == "Complete", [Link to App 2])
We can then use the results of that calculation to figure out if all tasks are complete. To do so, we’ll compare the value in Complete Tasks to the total number of linked tasks. If an IF statement is used as well, we can display one message for “In Progress” and one for when all tasks are complete.
The formula:
IF(
[Complete Tasks] == COUNT([Link to App 2]),
"All Tasks Complete",
"In Progress"
)
Note that spacing is ignored, so I put each part of the formula on a different line with some indentation to make it easier to read.
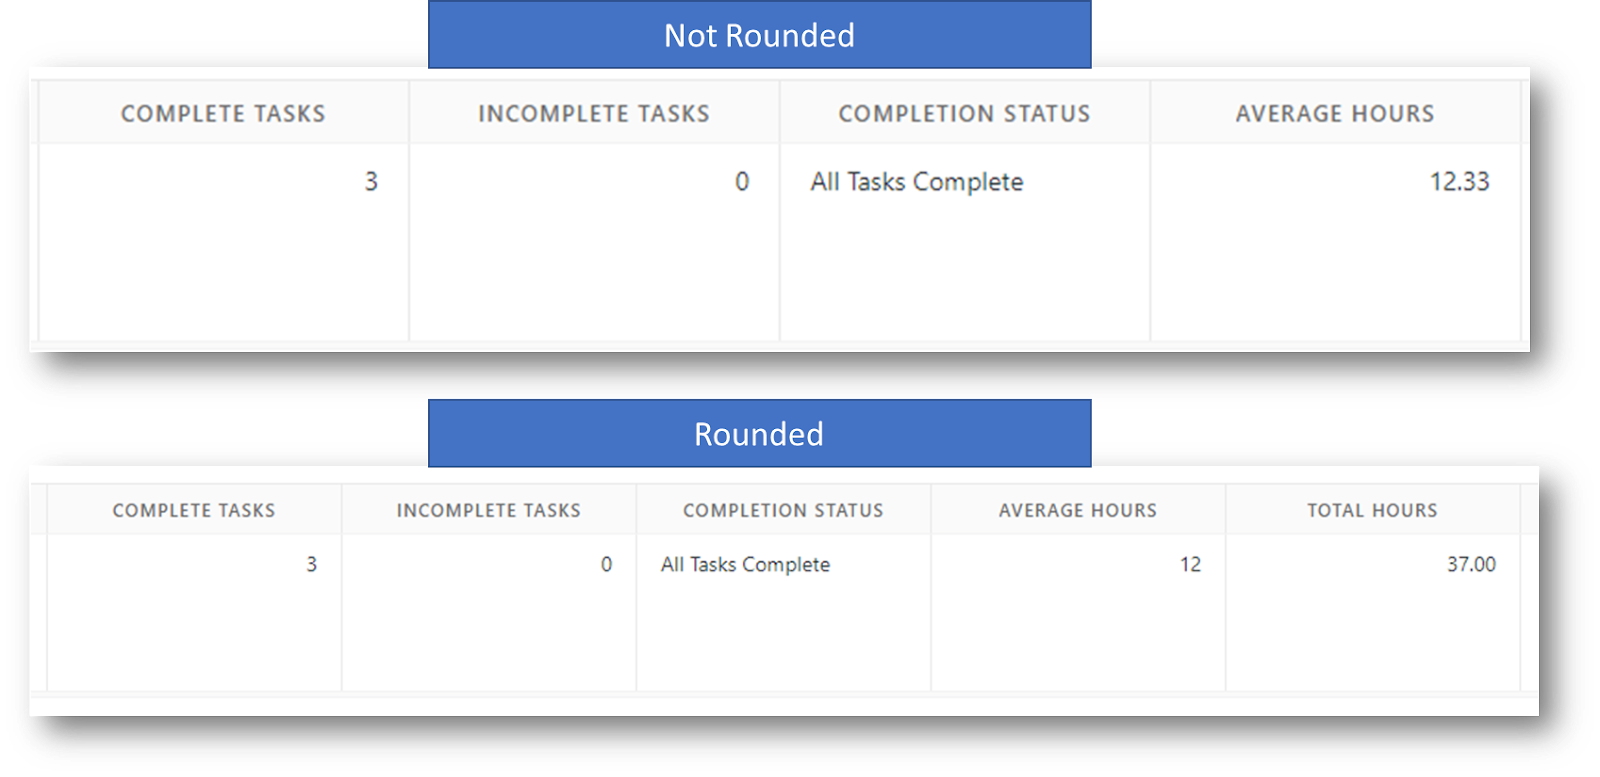
ROUND()
Syntax: ROUND([Number],[Precision])
The ROUND function lets you round a number to a desired precision, from 0 to 6. Specifying 0 indicates that you want to round to the nearest whole number, while specifying a number from 1 to six indicates the number of decimal places you want the number rounded to.
Example 5:
Let’s take the following example - adding an “Average Hours” formula to our existing example App:
AVG([Link to App 2].[Time Tracking Log])/3600
This formula will output a number with two decimal places of precision. If you instead want to see the average presented as the nearest whole number, just wrap it in a ROUND function:
ROUND(AVG([Link to App 2].[Time Tracking Log])/3600,0)
DATEDIFF()
Syntax: DATEDIFF( Date1, Date2, Unit )
Unit is one of the following:
- minutes
- hours
- days
- weeks
- months (uses 30 days for calculation)
- years
When you’re deadline-driven, it’s important to know how much time you have left on a project. You can quantify that value with the DATEDIFF function, calculating the number of days between two dates.
This is handy for triggering automations and alerts to assignees that they’re getting close to an important milestone.
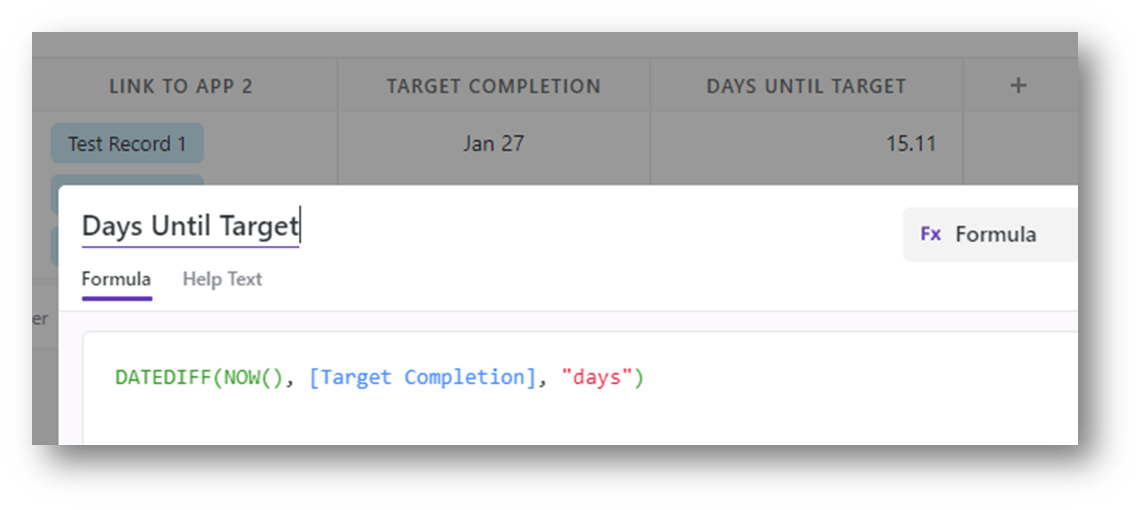
Example 6:
Let’s add a Target Date field (using a Date field type) to our sample application, and set a future date for our project. Now we can use the following formula to determine the number of days left before that date:
DATEDIFF(NOW(), [Target Completion], "days")
Note that if the target date is in the past the resulting value will be negative.
Bonus - combining DATEDIFF and ROUND
Here’s a formula that combines the DATEDIFF function with ROUND, calculating the age of a person based on their birthday (and ensuring that we always round down).
IF(
ROUND(DATEDIFF([Birthdate],NOW(),"days") / 365.25, 0) > (DATEDIFF([Birthdate],NOW(),"days") / 365.25),
ROUND((DATEDIFF([Birthdate],NOW(),"days") / 365.25) - 1, 0),
ROUND(DATEDIFF([Birthdate],NOW(),"days") / 365.25, 0)
)
WORKDAYS and WORKDAYS_DIFF
Syntax:
- WORKDAYS([Start Date], [Number of Days]
- WORKDAYS_DIFF([Start Date], [End Date])
The last example using DATEDIFF shows you the absolute number of days between two dates, but often it’s useful to know how many working days separate two days. You can calculate that easily with the WORKDAYS (and there is additionally a WORKDAYS_DIFF function as well) to make sure you’re not considering weekends and holidays when doing your math.
WORKDAYS returns a date representing the working day that is the specified number of working days from the start date. WORKDAYS_DIFF returns the number of working days between two dates.
Example 7:
Say that you have a type of project where your target completion date is always 5 days from its start date. Add a Date field for your start date, and then use the following in a formula:
WORKDAYS([Start Date], 5)
Let’s also show how WORKDAYS_DIFF operates and validate that we are, indeed, picking a date that is 5 working days away by entering this formula in another field:
WORKDAYS_DIFF([Start Date], [Target Completion])

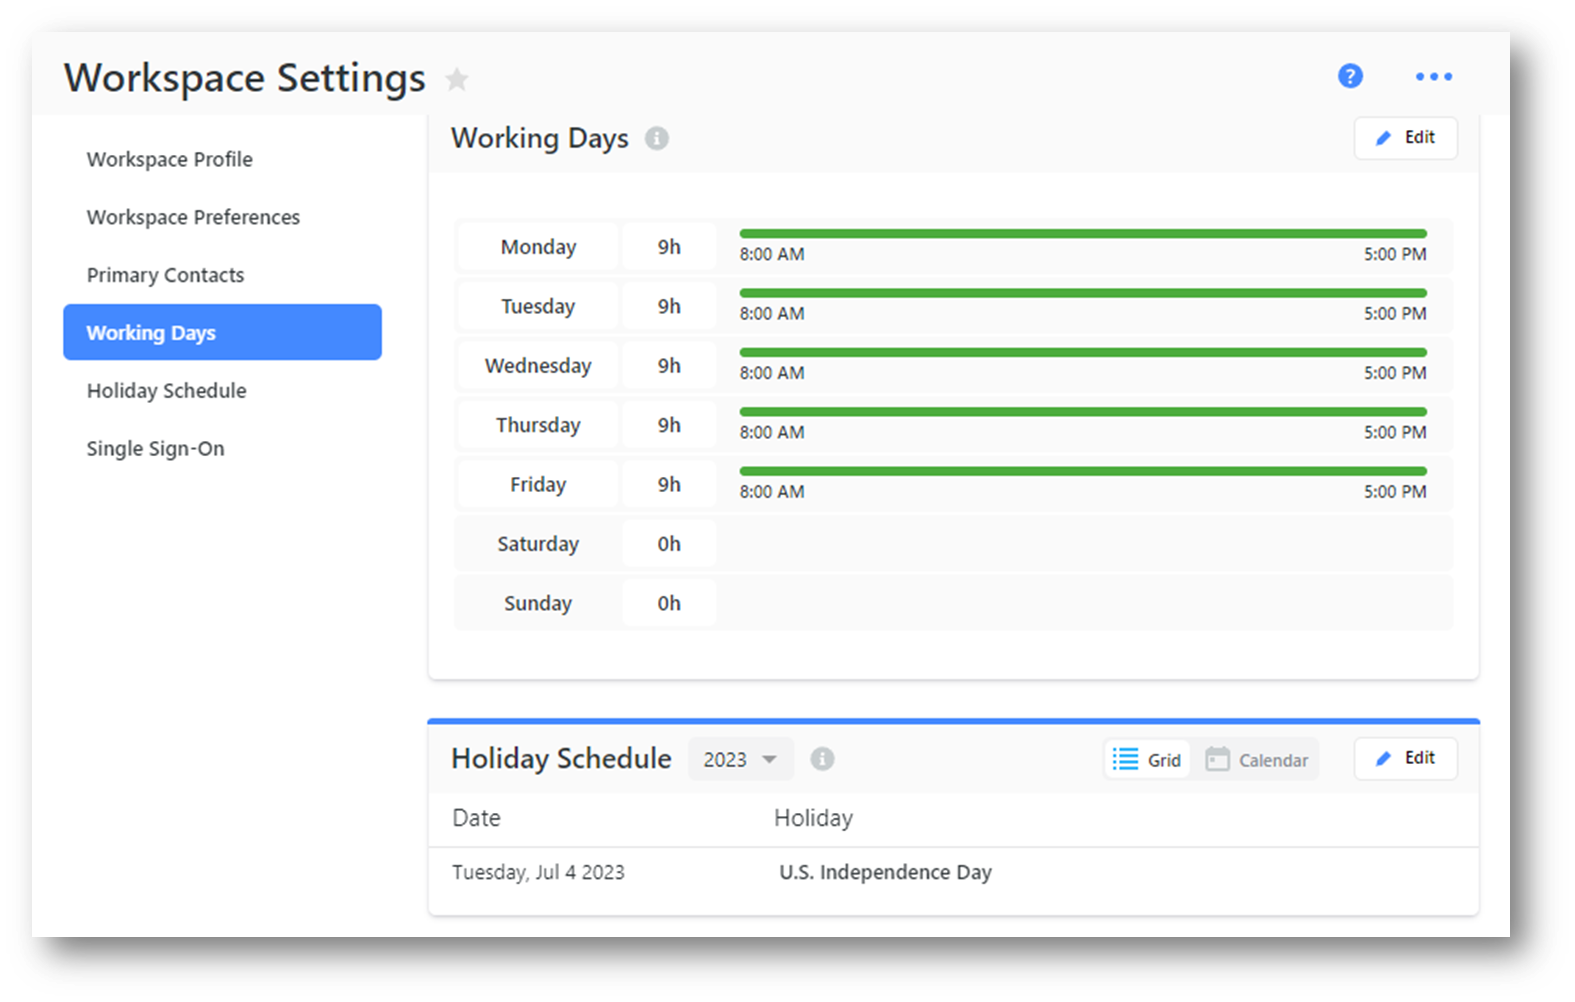
So what counts as a work day? SmartSuite handles this in two ways - an account Administrator can select working days of the week, and can additionally specify holidays that should also be counted as non-working days.
You’ll find those settings in Workspace Administration in the Workspace Settings tab.
LEFT and RIGHT
Syntax:
- LEFT([Text], characters)
- RIGHT([Text], characters)
The LEFT() and RIGHT() functions are used to extract a specific number of characters from the start or end of a string, respectively.
These functions work best when used with consistent data, like invoice numbers or area codes.
Example 8:
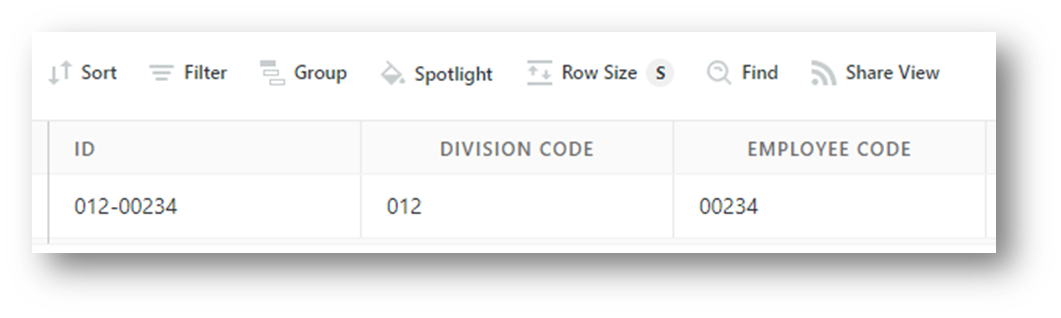
Let’s suppose that you’re tracking employee ids for an organization that uses a format like this for the number:
DIVISION-EMPLOYEE_ID like this 012-00234
The division code is always 3 digits and the employee id is always 5. We can use LEFT to get the division code, and RIGHT to get the id.
Formula for division code:
LEFT([ID],3)
Formula for employee id:
RIGHT([ID],5)
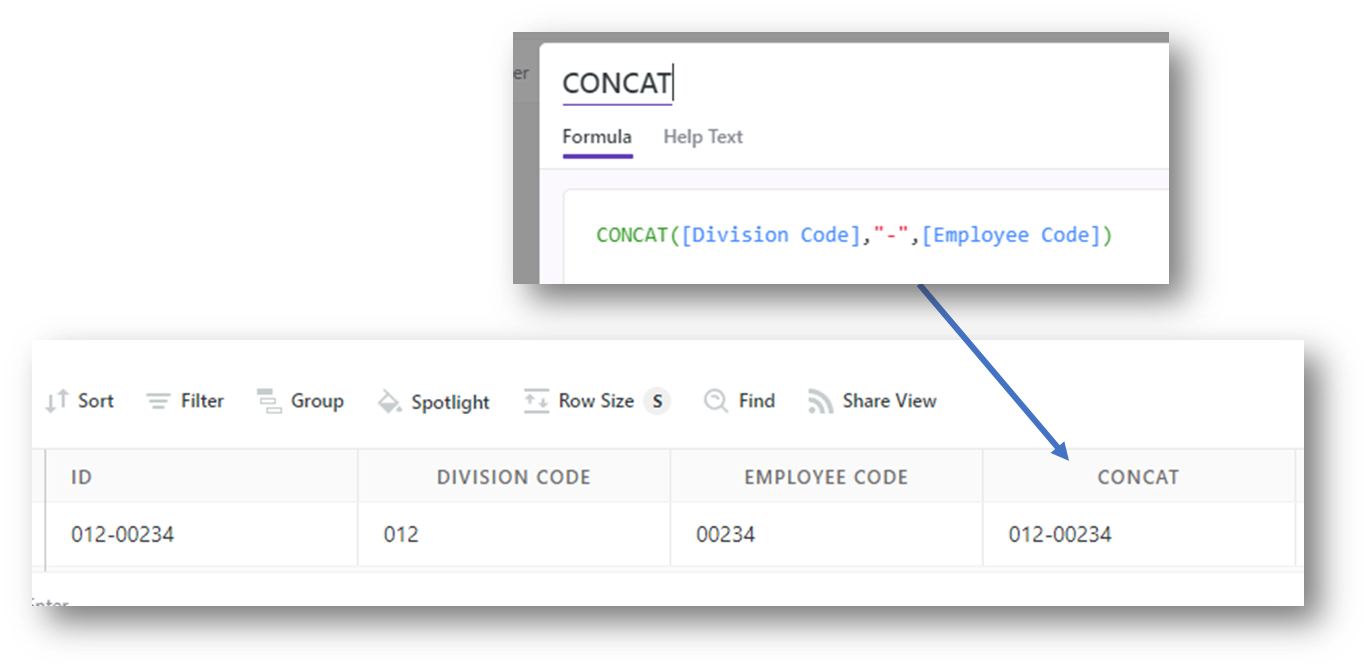
CONCAT
Syntax: CONCAT( Text1, Text2, ... )
The CONCATENATE() function is used to merge different text values into one string. It works in a similar way as the + operator and is commonly used to combine names, create project codes or create a mailing address from individual address, city, state and zip fields.
Example 9:
We could use CONCAT to re-create the ID number we looked at in the last example from the individual parts we created using LEFT and RIGHT functions. Just create a formula that is formatted like this:
CONCAT([Division Code],"-",[Employee Code])
Note: The same value can be created without CONCAT using the + operator, like this:
[Division Code] + "-" + [Employee Code]
NUMERICVALUE
Syntax: NUMERICVALUE( [Single or Multi-Select Field] )
A little-known feature of SmartSuite is the ability to associate a numeric value with single and multiple select options. You can do this by expanding Choices section of the field’s preferences:

Once expanded, you can the enable numeric values and enter them in the grid that is displayed, like this:

The NUMERICVALUE function returns the number associated with a single select field or zero if nothing is selected. Multi-select fields return the sum of selected values or 0 if none.
Example 10:
Suppose you wanted to create an employee evaluation that involves a rating for on time performance, quality and customer service. Employees are rated on a 5-level scale, from Excellent to Poor. Excellent ratings get 5 points, down to Poor ratings giving 1 point.
You could do this all with a complicated IF statement that looks at each possible value, but it would be hard to read and difficult to put together. The NUMERICVALUE function gives you a shortcut, allowing you to get the values for the selected items and sum them with a simple statement.
The formula looks like this:
SUM( NUMERICVALUE([On Time Performance]),
NUMERICVALUE([Quality]),
NUMERICVALUE([Customer Service])
)
You could even get fancy and decide that Customer service gets a weight of 1.5 if the employee’s primary job function is customer-facing, or make any other additional calculations you need to arrive at a total.

No-Code Does Not Equal No Customization
SmartSuite is designed to reduce the need for technical knowledge to configure the platform. We have added configurable features that perform most functions, while increasing your control through the use of functions and operators in formula fields. Understanding the syntax and the function appropriate for each situation can open up a whole new range of possibilities when automating processes.


.png)


