


Integrating SmartSuite with Google APIs using Make to create a distance-based assignment system
I recently demonstrated a Make scenario during an integrations Webinar that showed how you can use Google’s Maps API to incorporate distance information into your workflow, and thought that it would be a great topic for a blog post to dive deeper into the details. I’m constantly amazed at how the REST API standard has made it so easy to integrate all types of data into your daily workflows, automating things that used to require specialized systems and software, tens of thousands of dollars, and a lot of development time.
Fortunately for us, the Make platform’’s capabilities - combined with SmartSuite’s workflow functions, data storage and user interface - now make it easy to streamline a workflow that would otherwise require a number of manual steps. The scenario presented here had its origins with a consulting company that was working with a home healthcare company. That business needed to match healthcare professionals (we’ll call them contractors for brevity) with the locations that needed their services (the “facilities”). In the past, the company would have their staff look at maps, run google searches and manually select the appropriate providers.
There were additional complications, namely that each individual contractor could specify the maximum distance they were willing to travel to a facility, and could also specify the hours of the day they were willing to work. I’ll factor those two considerations into both the SmartSuite design and the Make configuration that we’ll put together to properly match facilities up with the appropriate list of eligible contractors.
SmartSuite Structure
Let’s begin by looking at the structure of a SmartSuite Solution that will support the scenario’s requirements. We need several things:
1. People. We’ll need information about our contractors, including their daily availability, address and maximum distance.
- Formula - you’ll also need to add a formula field to your people app to grab the text of the address field’s complete address. The Make connector does not yet support the address field, but it can be worked around by capturing the address value in a formula that looks like this: CONCAT([Address])
2. Sites. Information about our facilities, specifically each facility’s address
3. Requests. This App will contain the inbound requests for a contractor at a facility, including the day and time required, as well as the facility the care needs to be provided at.
4. Distances. Here is where the magic happens… we’re going to create a small database of contractor-facility distances. This data store lets us make the distance lookup one time per relationship, instead of needing to do this every time a request is made.
A few configuration notes:
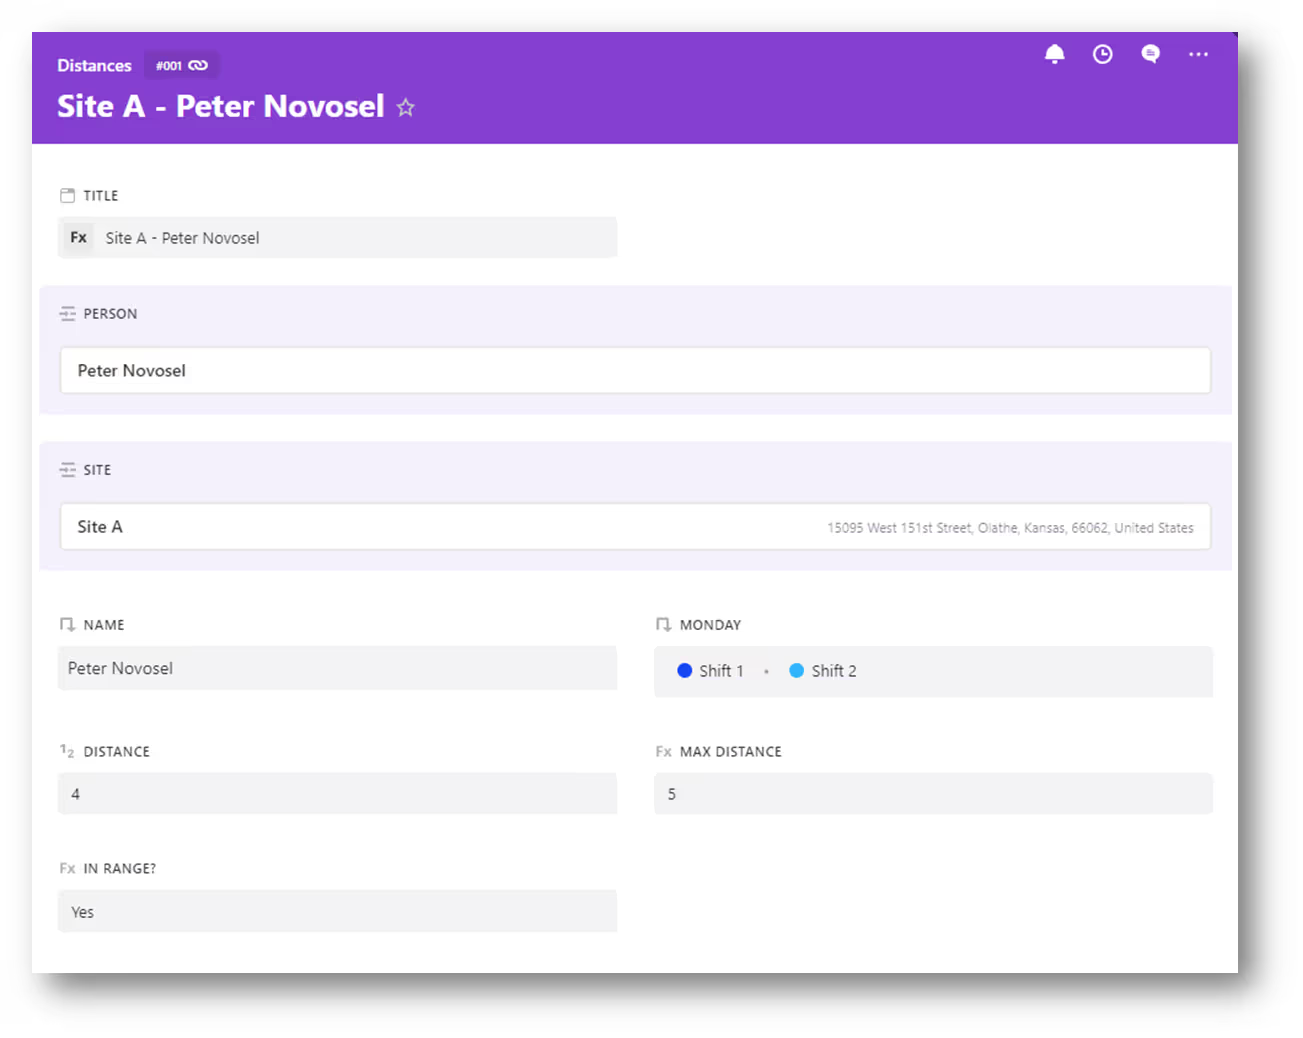
- For each contractor and facility we need the distance between the two parties and a calculation that tells us if the contractor is “in range”
- You will also want to add Lookup fields to each of the days’ availability Multiple Select fields in the People App. This will allow us to compare shift availability on a daily basis from this same record when we use it in the Make scenario.
An abbreviated view of the Distances App records looks like this (only Monday’s scheduling data is being shown - a production version would have all week days represented):
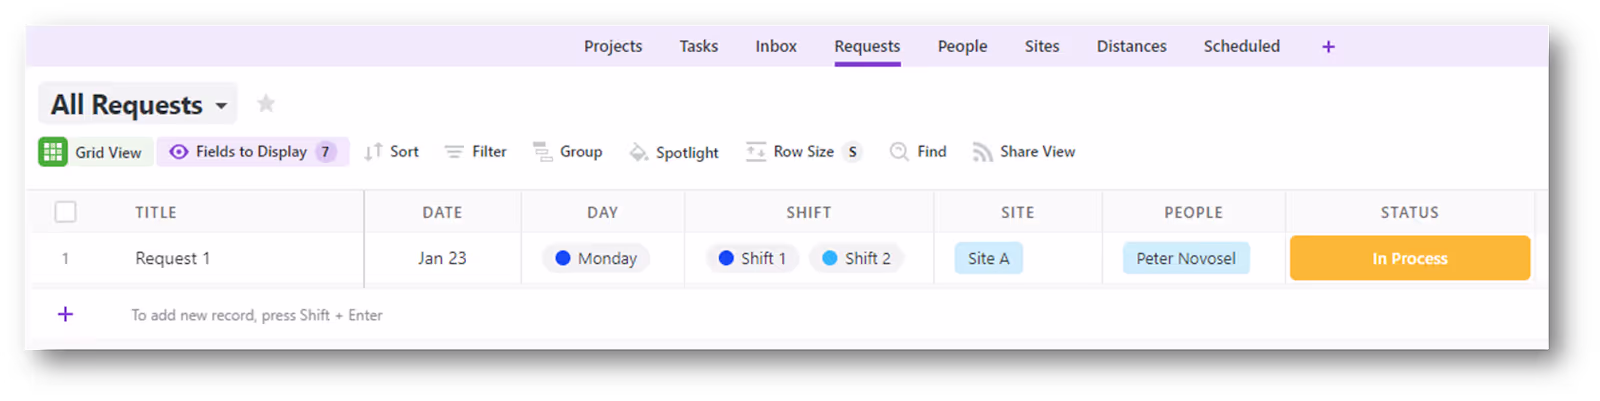
Our requests look something like this, showing the requested day, shift (time), required facility (site), and available contractor (people):
Populating the Distances App
Before we can start looking up contractors who meet the requirements for a new work request, we need to populate the Distances app described previously. To do that we’ll use Make, the SmartSuite connector, a custom HTTP request, and a Google Maps lookup.
In a production environment, at least two Make scenarios would be required - one that handles new facilities being added in the Sites App, and one that manages the addition of a new contractor in the People App. A fully-mature implementation might also handle changes to their party’s address, hours of availability, maximum distances and similar updates that would change the determination of valid contractor-facility matches.
For demonstration purposes, we’ll create a Make scenario for managing the addition of a new Contractor. Here is the entire flow:
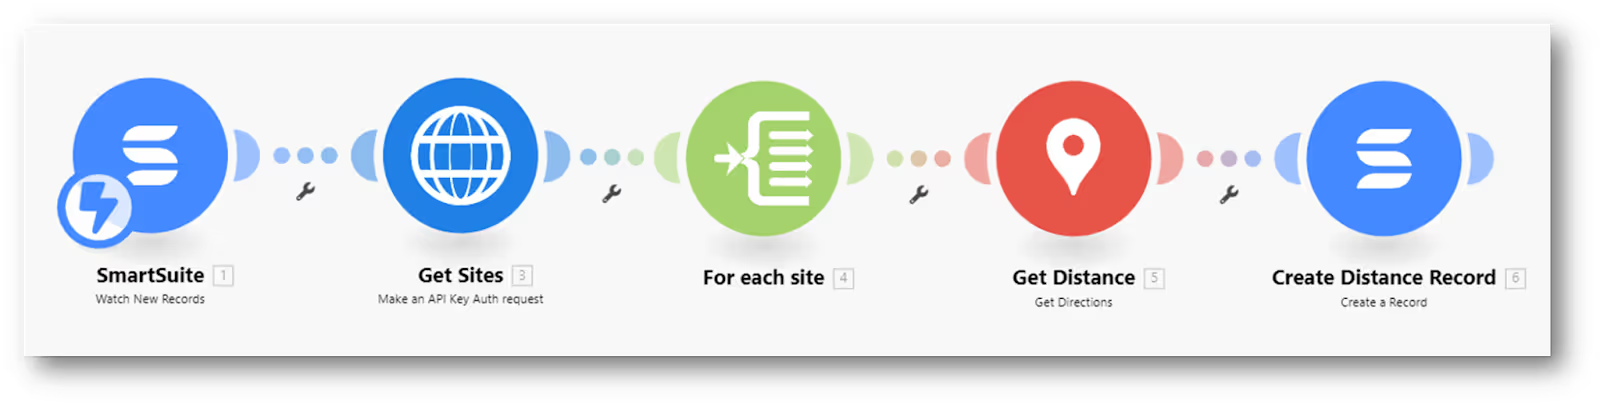
It is a linear scenario with the following steps:
1 - Get New (or Updated) Records
For simplicity, we’ll just watch for new records being added in the People App using SmartSuite’s “Watch New Records” trigger. Again, a production version might watch for certain criteria when the record is updated (a Status set to “onboarding” or something similar).
2 - Get Sites Data
Next, we need to go grab all of the records in our Sites App. We’ll do this with a Make HTTP “Make an API Key Auth request” action. Note that this is currently a work-around, as SmartSuite’s connector has a “Make authenticated API call” action, but there is a bug in Make that prevents us from sending a value in the body of the request.
To configure the request, specify the following values:
Credentials. Create a new API Key credentials with:
- Name: Authorization
- Value: Token [Your API Token]
This information will be attached in the header of the request.
- Method. POST
- Headers.
Create two headers:
Header 1
- Name: Content-Type
- Value: application/json
Header 2
- Name: account-id
- Value: [Your account Id]
Body Type. Raw
Content Type. JSON
Request content: {“hydrated”: true}
Parse response. Yes
Note that adding the “hydrated” flag causes the API to return labels for fields as well as their values, so we get the text of Linked Record title fields and other “id” type fields.
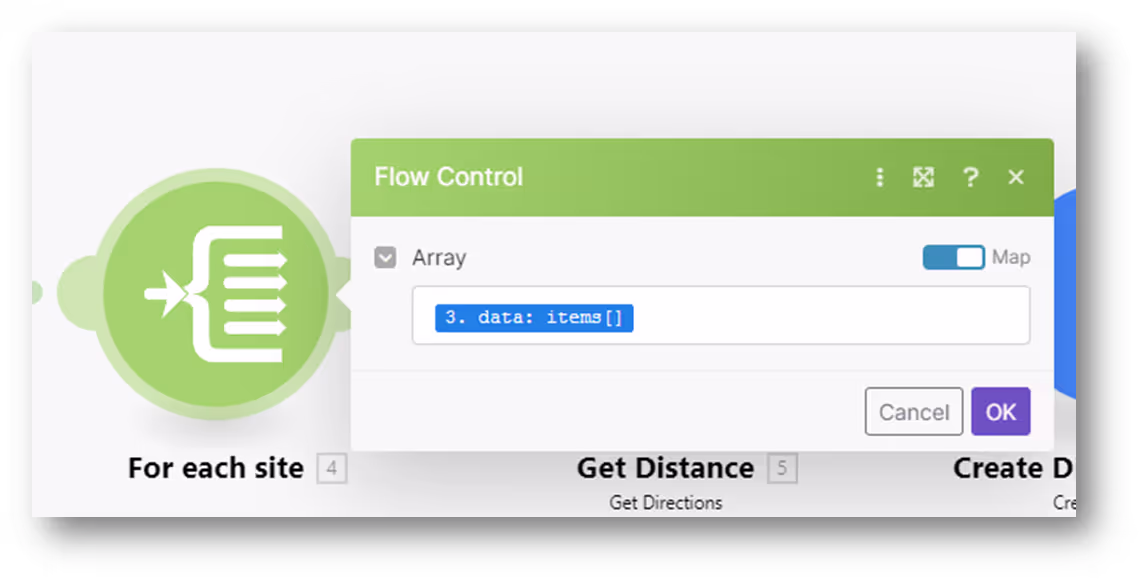
3 - Iterate Site Data
The next thing to add is a Make “Iterator” module. You’ll need some data in your scenario to configure it, so save the scenario, then right click on the step 2 module (get sites) and select “Run this module only.” It should retrieve data that we can then use to configure our iterator. If it succeeds, you’ll see a thought bubble with the number 1 in it. Clicking it shows you the data:

You can then click on your Iterator module, and specify the data: items[] array for the Array value, like this:
4 - Get Distance Value for Each Site
Each step after the iterator will be performed once per Site. That’s the function of the iterator, letting us do something with each bit of data in an array.
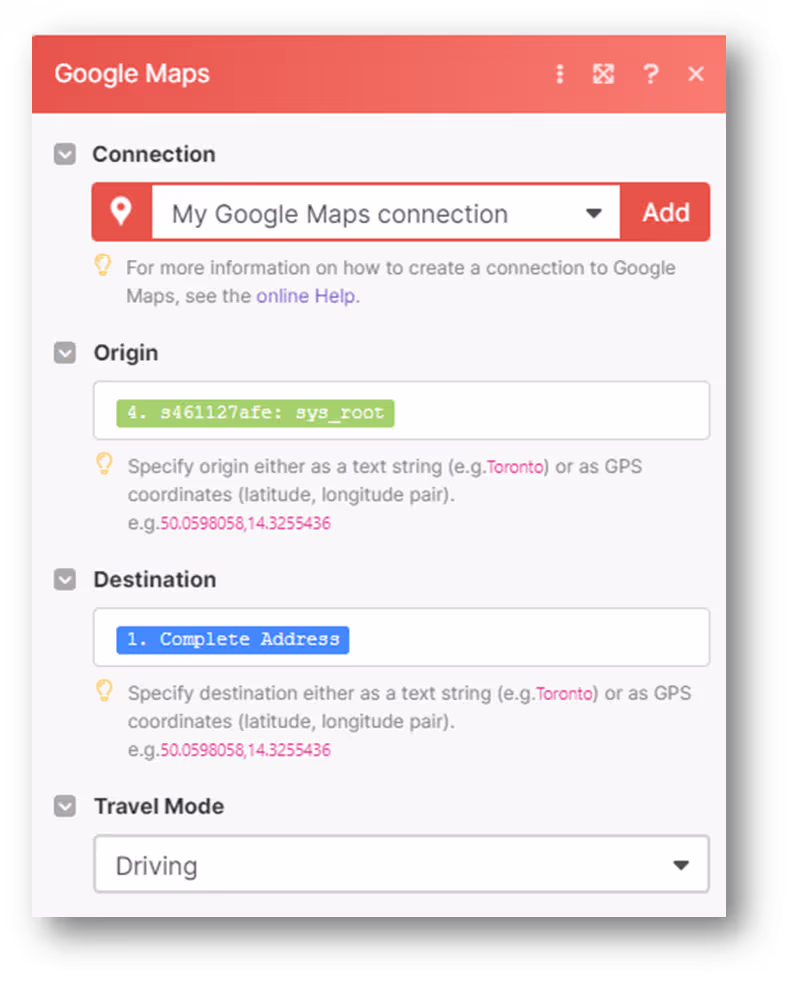
To get the site’s distance, we’re going to use Google’s Get Directions action from the Google Maps connector. Specify these configuration parameters:
- Connection. Create a connection to Google Maps’ API. You’ll need a Google API key, which you can learn how to create here.
- Origin. Select the “sys_root” value from the Address field returned in the Get Sites step. You can find the address field ID in your SmartSuite API docs.
- Destination. Select the formula containing the full address from step 1’s trigger for this field.
- Travel Mode. Driving
- Units. Select Imperial for miles, or Metric for kilometers
5 - Create Distance Record in SmartSuite
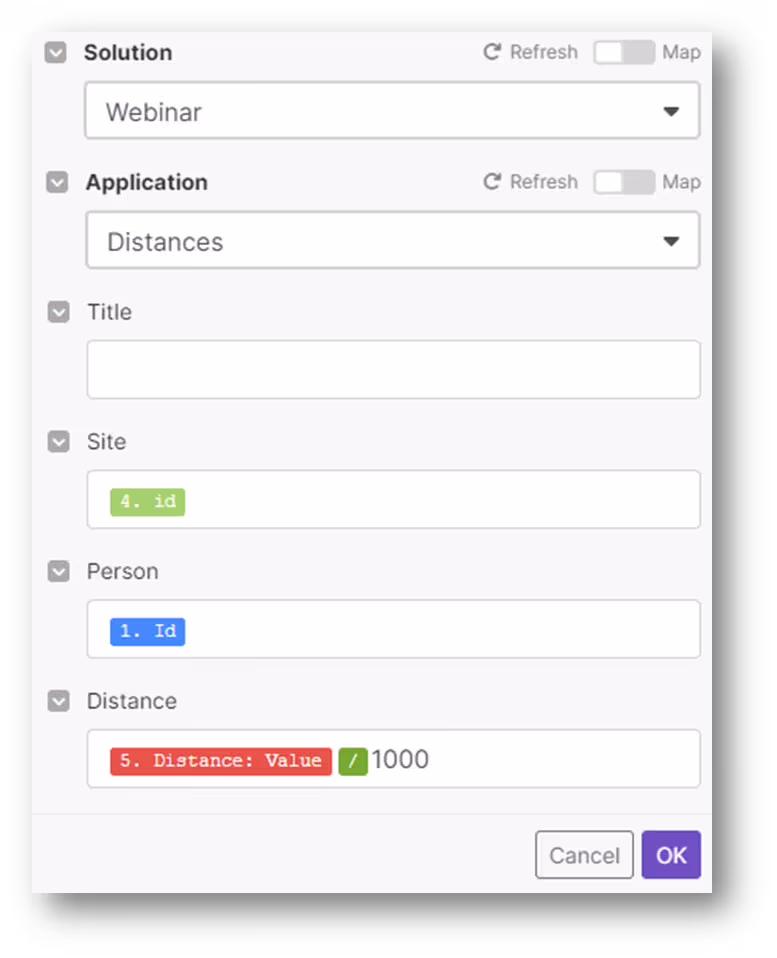
The final step in this scenario is to create the actual SmartSuite Distance record. It involves just three values outside of the selection of the Solution and Distances App:
- Site. Set this value to the “id” property from the “Sites” iterator.
- Person. Set this value to the “id” property of the step one trigger.
- Distance. Set this to the “Distance: Value” property from the Google Maps lookup, divided by 1000 (as they return thousands of miles).
It looks like this:
Matching People and Sites
Now that we have the infrastructure ready, we can create the Make scenario that determines which contractors are available for requested assignments. We’ll do this by evaluating (1) the contractor’s shift availability by day, versus the requested shift(s), and (2) the distance of the contractor from the requested facility.
The overall scenario flow looks like this:
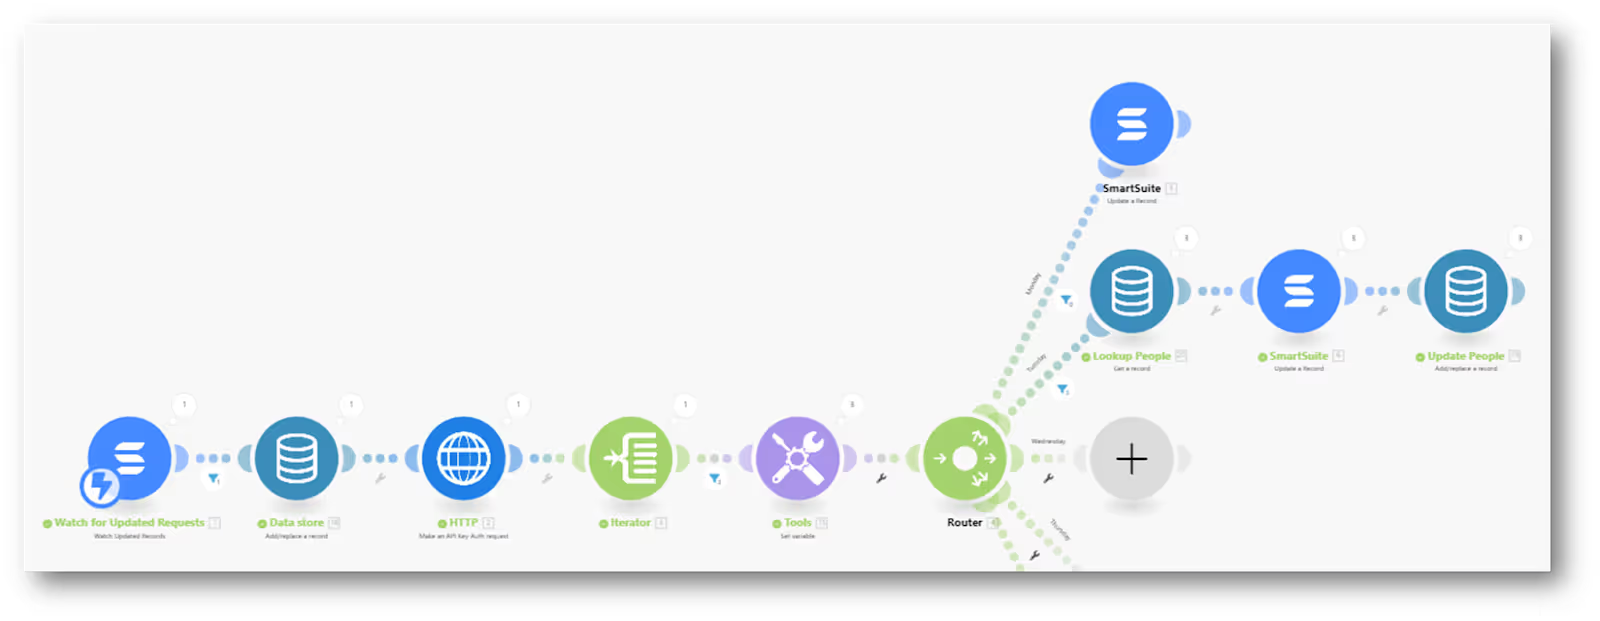
This flow is mostly linear, with a router after the iterator to handle values for different days of the week availability. Here are the steps:
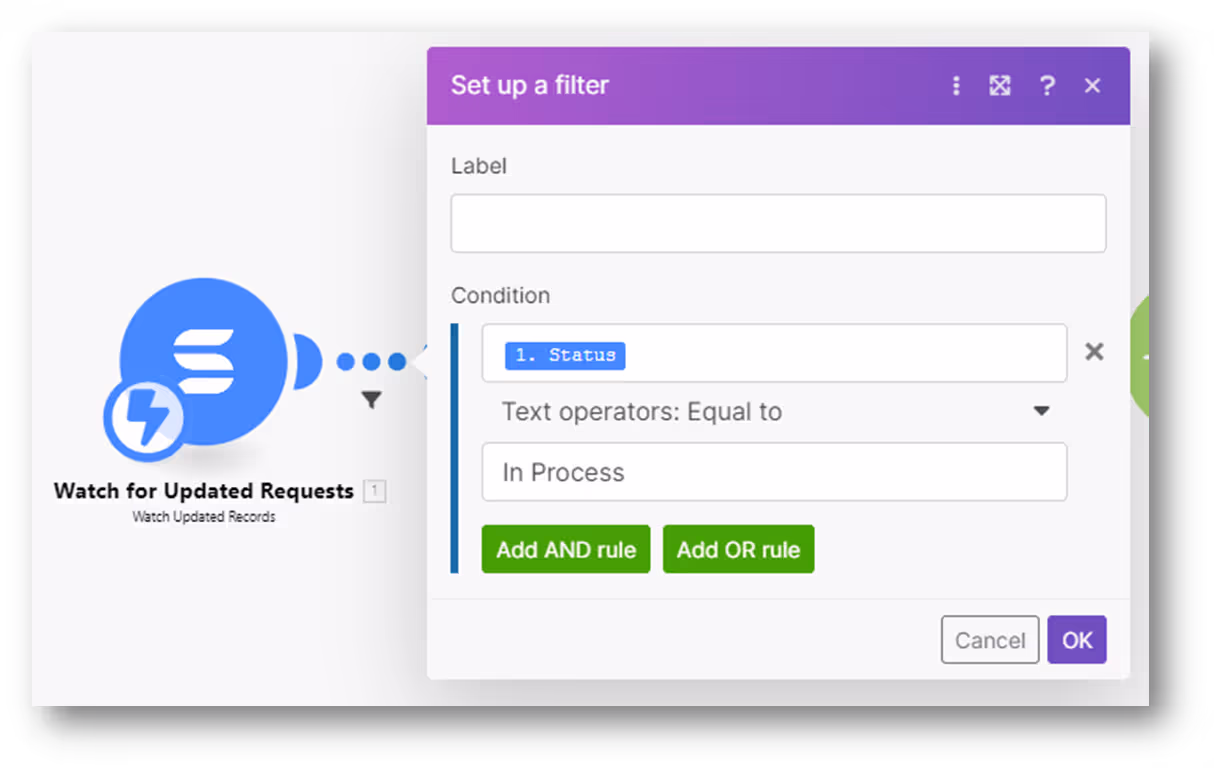
1 - Watch for Updates to Requests Records
Step one uses a SmartSuite “Record Updated” trigger. In this case I set a condition of when Status is equal to “In Process,” but that criteria can be modified to fit your use case.
2 - Create Data Store
To make sure that we append all of the individual people we find to the request record, we’re going to use Make’s built-in data store. We’ll save the initial values of the People Assign To field in this step. We’ll look up the existing values and append new ones to the data in future steps.
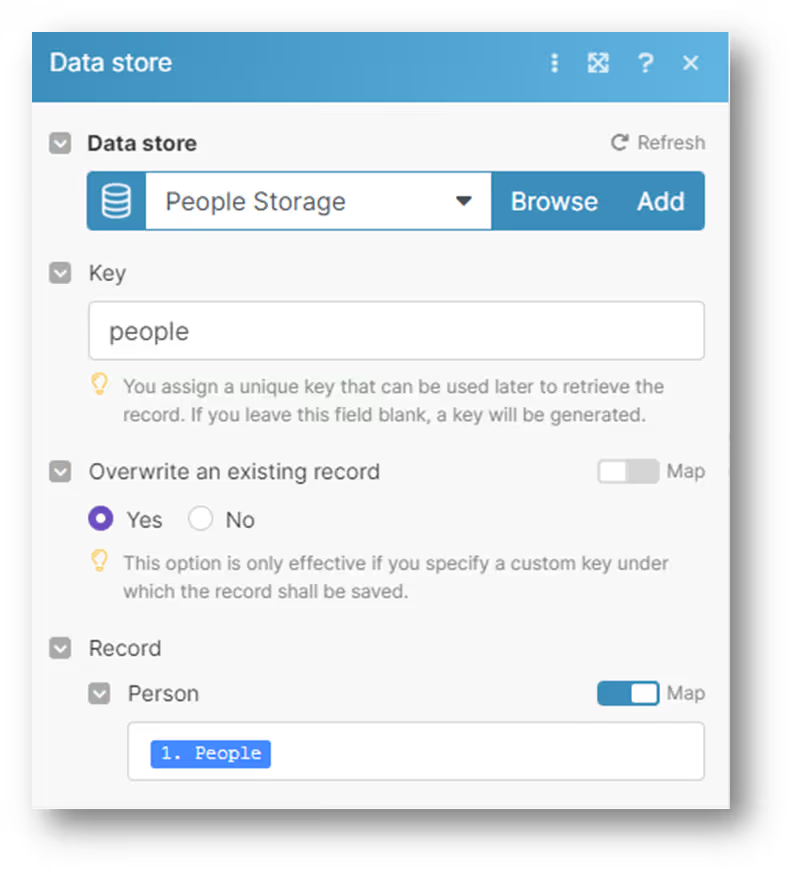
Create a Data Store module using the “Add/replace a record” action. Then you need to:
- Give it a name
- Define a data structure. Just create a single field called “Person” and make it an array of text fields.
- You can leave Data storage at 1MB

Once it is created, give it a key of “people” map the “Person” value to “People” from step 1, setting values:
- Data Store: the one you just created
- Key: people
- Overwrite existing: Yes
- Record / Person: Map to “People” field from step 1
It should look like this:
3 - Get Distance Records
Next, we need to go grab all of the records in our Distances App. Like the last scenario, we’ll do this with a Make HTTP “Make an API Key Auth request” action.
To configure the request, specify the following values:
- Credentials. Use the same credentials you used in the last scenario
This information will be attached in the header of the request.
- Method. POST
- Headers
Create two headers:
Header 1
- Name: Content-Type
- Value: application/json
Header 2
- Name: account-id
- Value: [Your account Id]
Body Type. Raw
Content Type. JSON
Request content: {“hydrated”: true}
Parse response. Yes
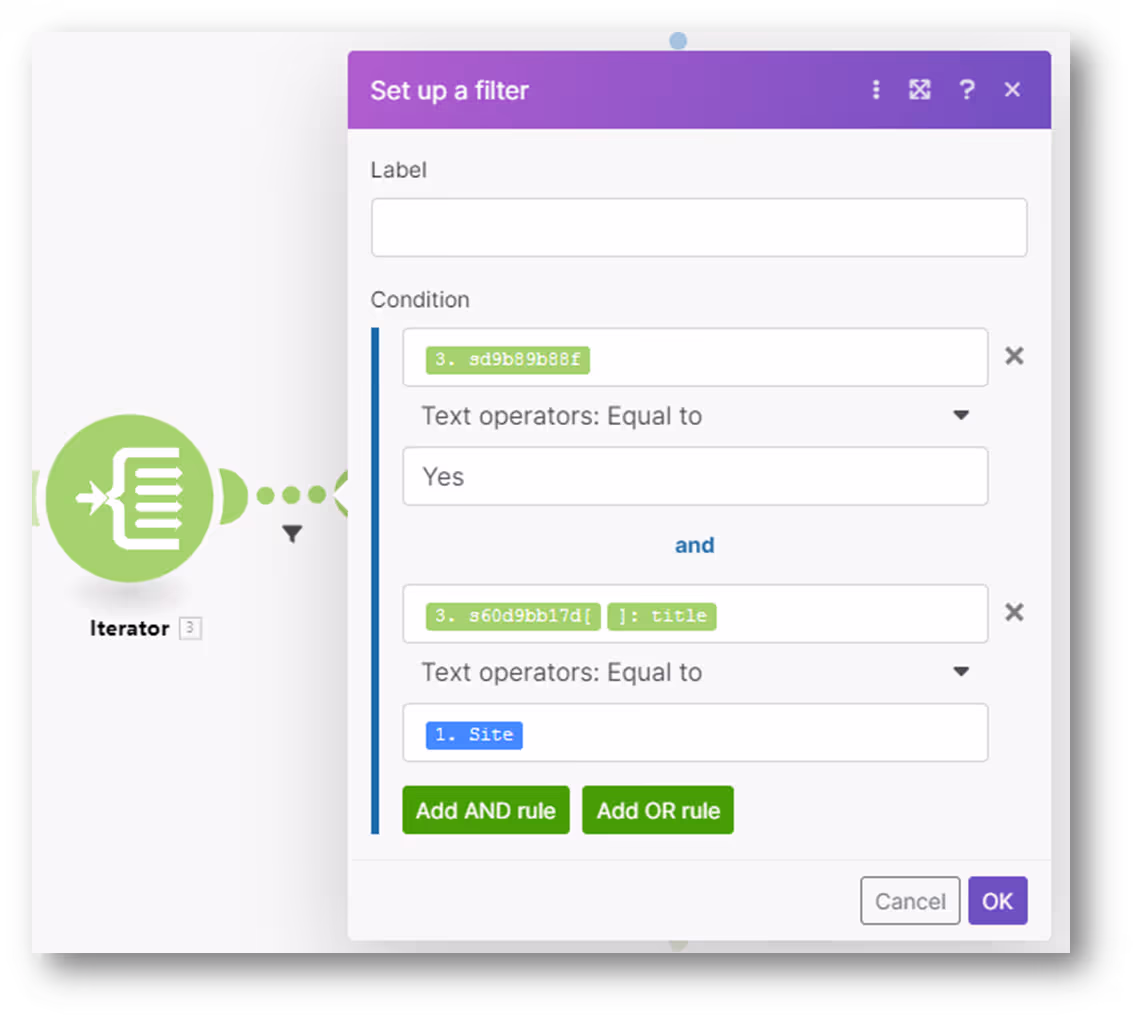
4 - Iterate Distance Data
We’ll again make use of the “Iterator” module. Run the module you configured to get the distance records, and then map the data: items[] array in the Iterator’s configuration.
You’ll be connecting a Router in the next step, but the link from the iterator to the router should have a filter. We only want to further evaluate those distance records that (1) are associated with the requested site/facility, and (2) are in range for the contractor. Your filter should look something like this:
5 - Set a “Person” Variable
Next, we’re going to use a Make variable to extract the person for this iteration (from the collection of data retrieved from Distances). We want to refer to the Data items: [Your Person Field Id], inserting the iterator index in the brackets. It should look something like this:
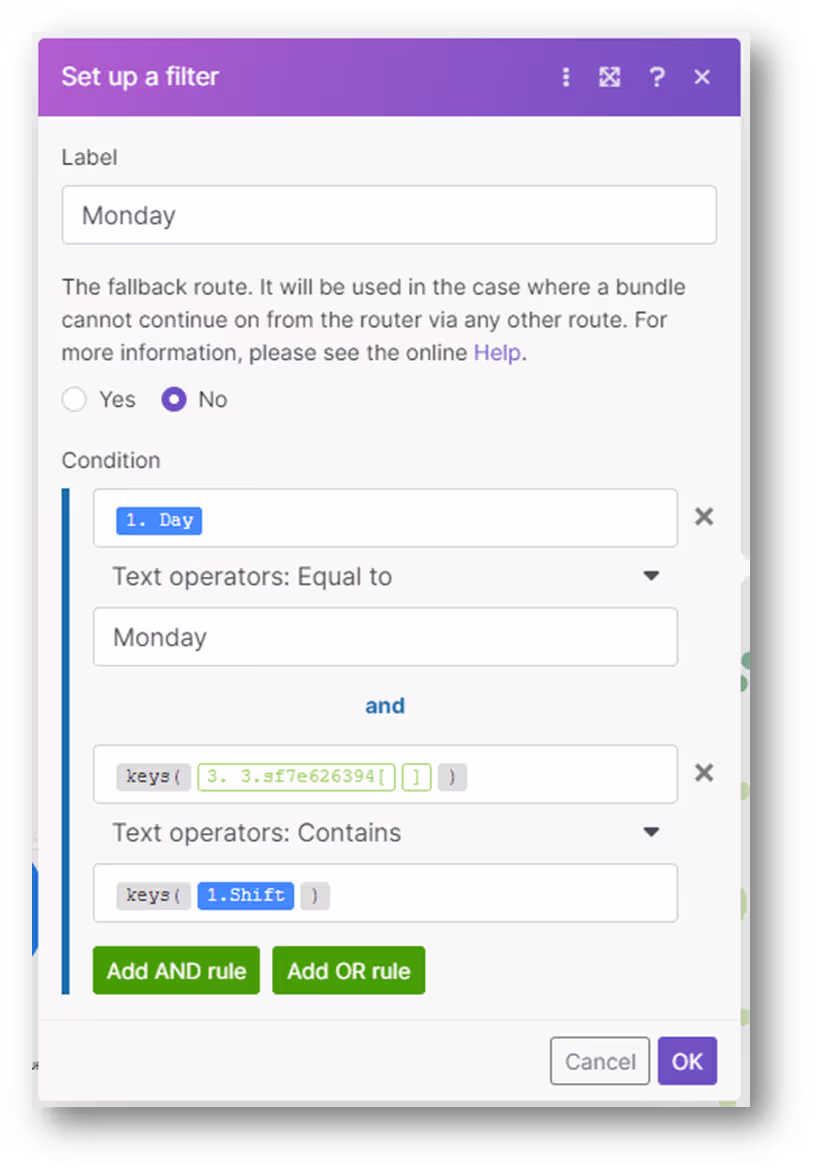
6 - Add a Router
Next, add a Make Router module. The router itself doesn’t have a configuration, you configure the links you create from the router when you click on it. Click it once for each weekday you want to configure (i.e. Monday - Friday)
For demonstration purposes, I’ve only configured the “Monday” route in this scenario. A full implementation would have a configured module for each route.
Each route needs to have a filter configured. In this example, I’m setting a filter on day (Monday, Tuesday etc) and comparing the Distance record’s lookup value to the contractor’s shift availability for that day. Comparing the set of values in a Multiple Select field takes a little bit of Make formula magic: the keys() function.
We’ll compare the array key values from the distance record lookup field (you will again have to look up the field id in the API docs) with the array key values from the Request record’s “Shift” field (also a Multiple Select). We want to make sure that the contractor has all of the shifts available that are required for the Request. It looks like this:
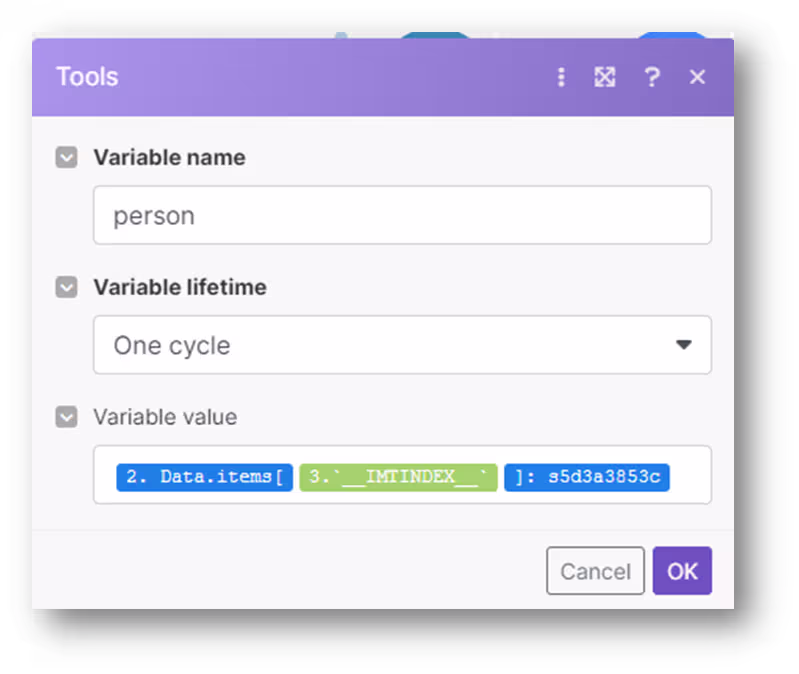
5- Add the Person to a Variable
We’re going to break this step out to further explore Make functionality - we’ll create a Make variable with the name of the contractor we’re going to add to the Request record.
Add a “Set Variable” action from the Make Tools module. Name your Variable person and give it a value of the Person field id from the iterator. The configuration should look like this:
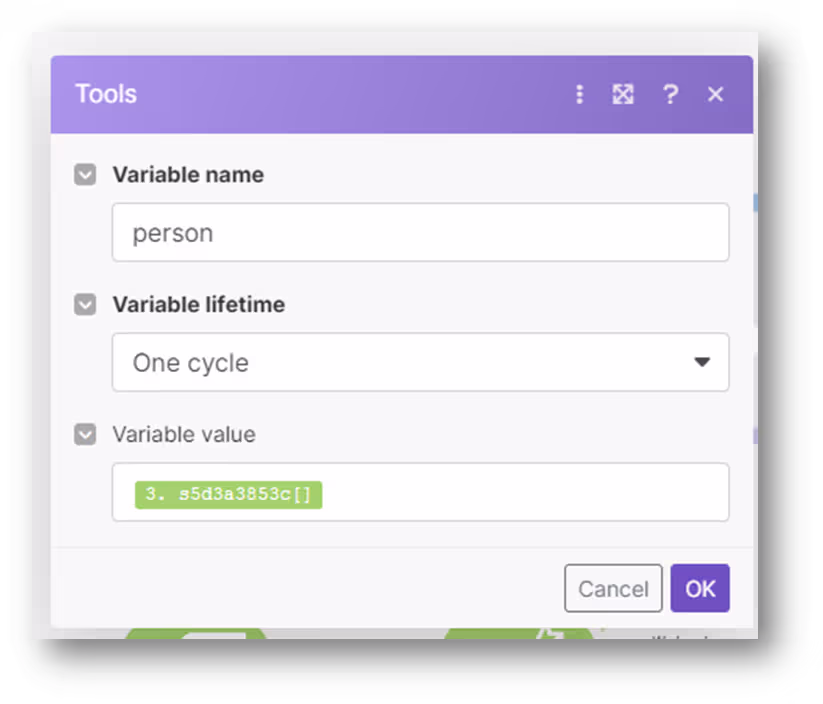
Variables are handy for aggregating values, performing complex manipulations or storing values that you need to use repeatedly.
7 - Look Up the People Data
Next, we’ll add a Data Store module using the Get a record action. Specify “people” as the Key value to get the data we stored before.
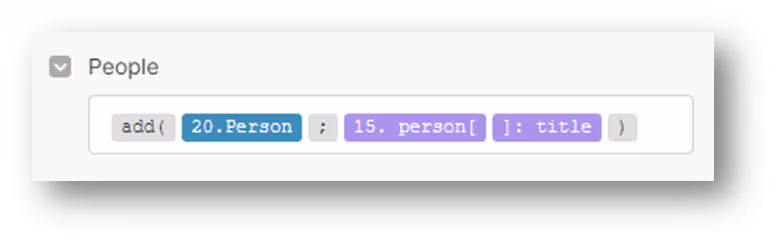
8 - Update the Request Record
Finally, we need to update the request record. We’re going to select the Requests app, and then map these fields:
- Record ID or Title. Map this to the Id from step 1.
- People. Add a formula to append the current person to the array of people we retrieved in step 7:
add( [Person array from Step 7] ; [Person text from step 5] )
It will look something like this:
9 - Update the Data Store
The final step in our scenario is to update the Data Store so that we have a running list of people - as we might have a number of matches, and we don’t want to keep overwriting the last value and losing it!
Use an “Add/replace a record” action from the Data Store module to perform the update. Set these values:
- Data Store: Choose the same data store from before.
- Key: people
- Overwrite existing: Yes
- Record / Person: Map to this formula:
add( [Person array from Step 7] ; [Person text from step 5] )

That’s it! You now have a fully-functioning workflow that assigns people to shifts based on their availability and distance from the location. You can further enhance this type of workflow to add steps to check to see if the assignee is already booked, match required skills and much more.
Conclusion
I hope that this blog article gets your wheels turning and you start to think about all of the possibilities for this type of workflow. Please share your use cases and configuration steps with the SmartSuite community!
SmartSuite provides work platform for standardizing workflows in the following areas:
- Governance, Risk & Compliance
- IT & Service Ops
- Project / Portfolio Management
- Business Operations


