


I’ve been answering a lot of questions about Make.com configuration, and have been working with it internally at SmartSuite to automate a bit of our customer information flow. For certain scenarios it has taken a bit of trial and error to understand the correct approach, determine all of the available Make.com options, and finally get to a solution that optimizes the number of required steps while operating reliably. I thought that I would put together a collection of these learnings and share them with you in this blog.
This is certainly not an exhaustive list, but there are a few areas that I think would be interesting for many people who are new to Make.com:
- Error handling. The Make documentation is a little bit light here, and it’s not entirely obvious how to proceed in many cases.
- Button click webhooks. We’ll see how easy it is to trigger a Make automation with the click of a Button field in SmartSuite.
- Upsert. SmartSuite is planning to add a “create if record doesn’t exist” function to the update action, but we’ll look at how you can work around its absence in the short term.
- Preserving existing values. Another area that will likely change in the long term is the handling of Linked Record, Multiple Select and similar field updates. We’ll look at ways to ensure that you don’t lose existing values when adding new ones.
Error Handling
Make.com is a powerful platform that allows users to automate their workflows by connecting various apps and services. One of the most important aspects of any workflow automation tool is error handling. Errors can occur at any point in a workflow and can cause significant problems if they are not dealt with properly. Let’s briefly explore some of the more useful error handling features of Make.com and how they can be used to ensure smooth workflow automation.
Break Module
The Retry module is one of the most useful error handling features of Make.com. It allows users to specify how many times a module should be retried if an error occurs. For example, if a module fails to execute due to an API timeout error, the Retry module can be configured to retry the module a certain number of times before giving up. This feature ensures that the workflow does not stop due to a temporary error and helps to improve the overall reliability of the workflow.
The Break module is useful when you’re interacting with a service that may experience intermittent failures (timeouts, etc.) as it allows you to retry an action a number of times. I’ve used this when I can possibly have a race condition as well (i.e. a new account is created and you want to get the account’s Id from Intercom - but the Intercom account has yet to be created).
Resume Module
The Resume module is perfect for situations where you expect an error, such as receiving a 404 (not found) from an external call. It allows you to specify alternative values for the output of the module that generated the error and then continue to the next step.
We’ll use this error handler in an example later in this post to construct an “upsert” flow, where we’ll create a record after we receive a 404 when trying to update the record.
Filtering Errors
It’s important to know that you can use filters on error handlers, just like other modules. That gives you the flexibility to handle only certain types of errors, retrying when appropriate or throwing an actual error if you get something you didn’t expect.
Error handling is an essential aspect of any workflow automation tool, and Make.com offers a variety of powerful error handling features that can help users to ensure that their workflows are running smoothly. With their excellent logging and execution history views you can quickly identify and resolve any errors that occur in your scenarios. I’m a big fan!
Button Click Webhooks
SmartSuite’s Button field allows you to create a formula that generates a URL, which is perfect for kicking off Make.com webhook triggers. We can pass a value like a title, record id or other bits of information to it and use those in subsequent actions.
Here’s an example of one that I put together for this blog. We’re still waiting on an ENCODE_URL function, so we’ll use REPLACE instead:
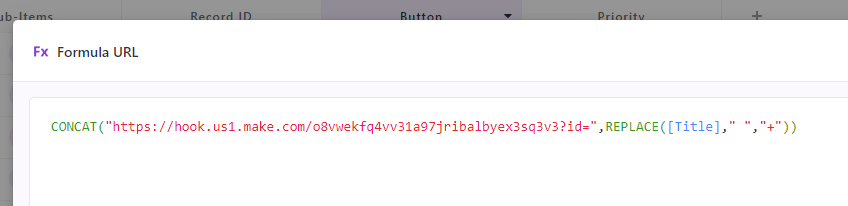
Be sure to have your Make webhook in “determine data structure” mode and click the button. You’ll see that Make finds the “id” parameter and the value you included for the title of the record.
Let’s continue this scenario in the next section and use what we’ve discussed about error handling and button click webhooks to create an “upsert” function.
Creating an Upsert Flow
There are any number of workflows that require you to either update a record if it exists, or create a new one if it doesn’t. As I mentioned previously, we can tell Make that we expect that a module could return an error that isn’t critical - it just tells us about the state of the system and data.
The webhook that we created previously sends a text value for the title of a record. This is perhaps a bit contrived, but we’ll use it as an example of interacting with SmartSuite where you don’t have a guaranteed unique identifier for a record. Let’s say that you want to use that text value to either create or update a record.
One approach would be to use an Authenticated API call to search an app to see if a record exactly matches the text input. While this is a completely valid approach, it does require you to understand how to assemble the API call and query. We can work around it with native SmartSuite actions, coupled with a little bit of Make.com error handling.
We’ll first try to use the value as the title field value in a record update action. If the value doesn’t exist, SmartSuite will return a 404 “not found” error. We can anticipate that response in our Make scenario, adding an error handler that deals with that result and passes the scenario along to a create record action.
There are a few steps required to set up this flow:
- Create the basic structure with the inbound webhook, the update record action and then a create record action.
- Right click on the update record module and select “Add error handler,” selecting the Resume module as the error handler.
- Click on the resume module and configure two values:
- Id: since we don’t know the record id (it doesn’t yet exist!) we’ll set the value for Id to NONE. We’ll use this in the next step as a filter condition
- Title: set this to the “id” parameter passed in from the webhook - we’ll use it in the create action
- Add a filter to the connection between the update and create actions. It just needs a single condition, where Id is equal to NONE.
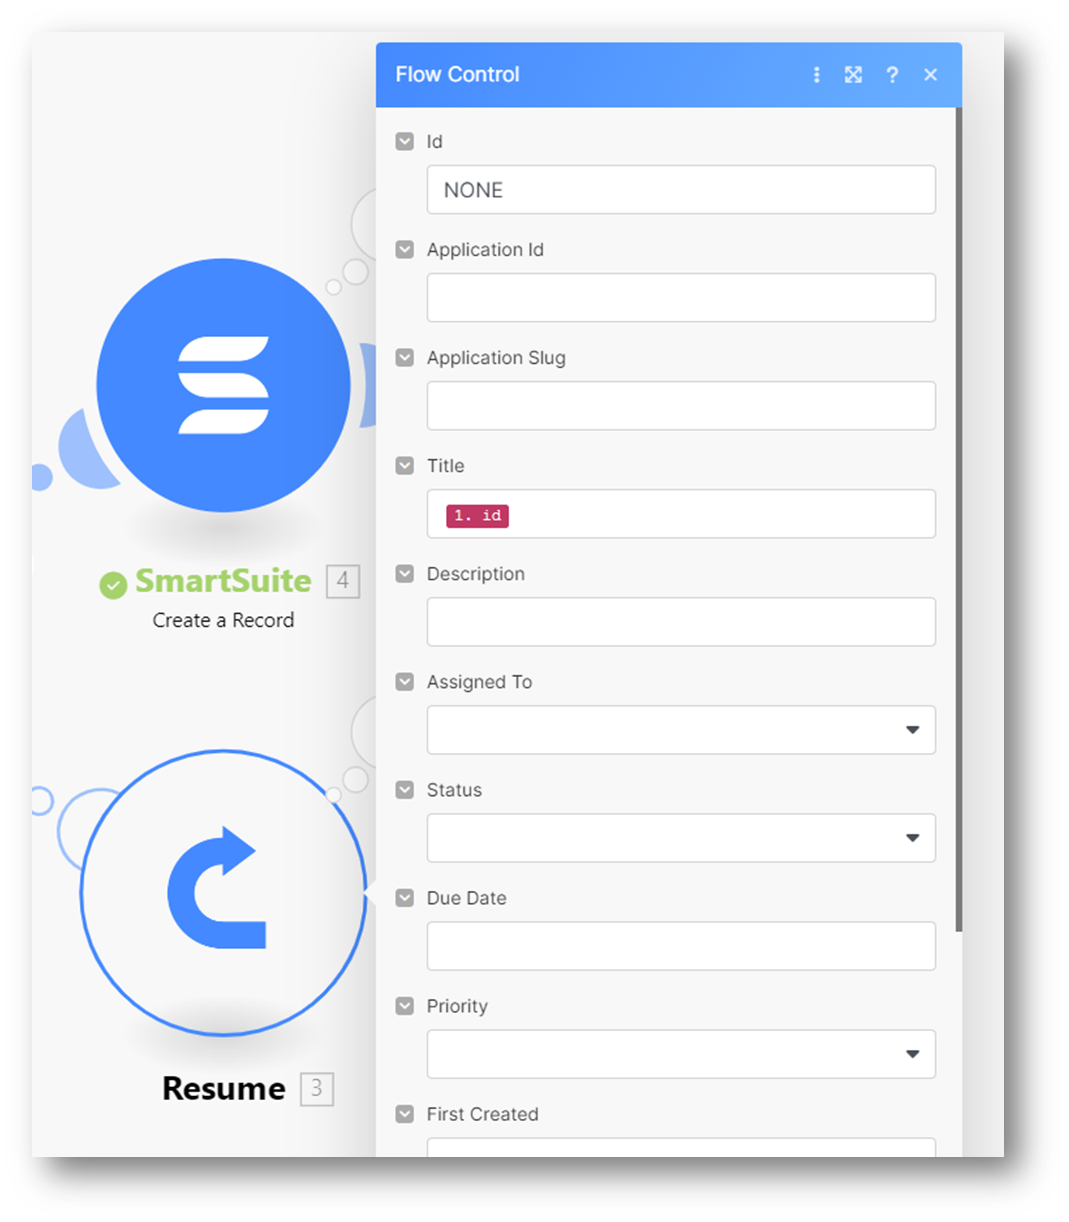
Here’s what the Resume module should look like:
Your filter should look like this:

And that’s all there is to it, you have the entire flow configured in just a few simple steps. Now, when the update fails with a 404 the Resume module will set the values you specified, the filter will allow the scenario to continue, and you can use the Id value to set the name for your new record.
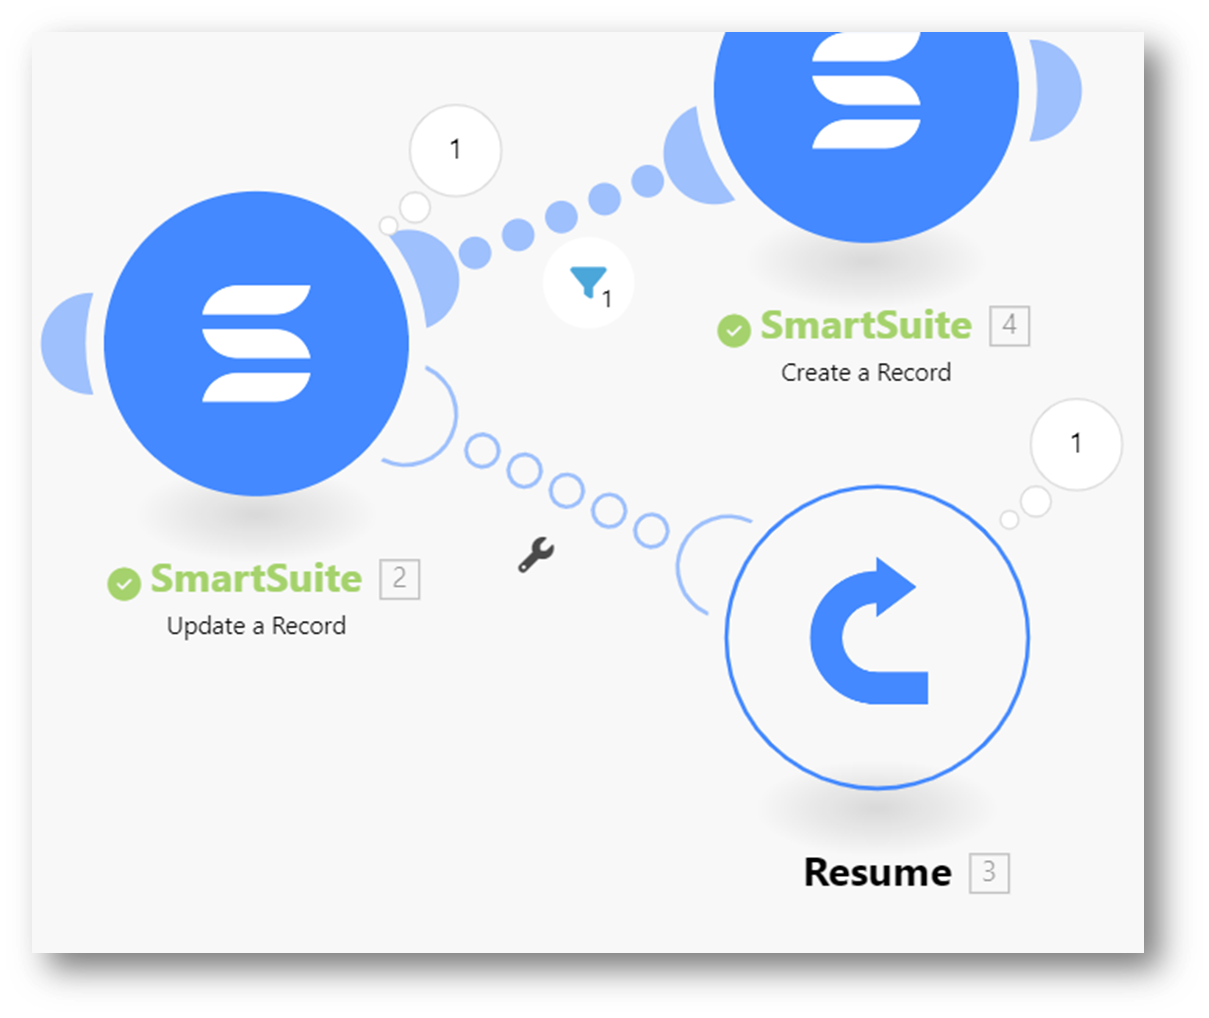
The entire scenario looks like this:

Preserving Existing Values
When you update a Linked Record value, you are setting it’s “absolute value” - i.e. any existing values will be removed. SmartSuite is tracking an enhancement request for the Make connector to support appending values, but in the interim if you want to preserve existing values you need to ensure that existing values are added back into the updated value.
If you’re making a single addition this isn’t a big problem. You can use Make’s add() function to append a value to the existing value of the field. It will look something like this:
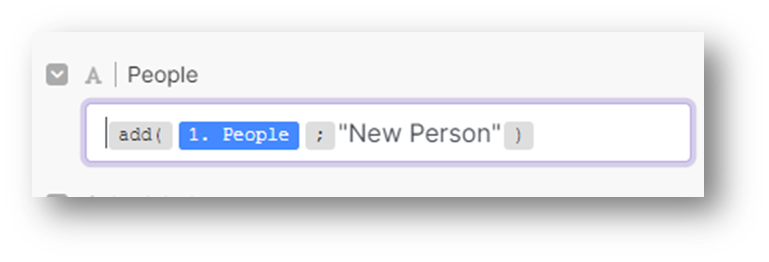
Replacing the “New Person” with whatever value you’ve generated through another action. The complexity increases a bit if you need to append a number of values to the list. Say that you need to iterate through a list of items, adding each to the Linked Record. In this case we need to keep track of the values, building up a list that can be added to the record. Since you can’t just add to the original value (Make doesn’t persist that added value in the original field), you’ll have to use another mechanism.
There are several ways to do this in Make, but one way is using their Data Store. The Data Store allows you to define a data structure and how values are persisted. You can create one that holds a single array called “People” - and set it to “overwrite existing records” so that it resets with each run of the scenario.
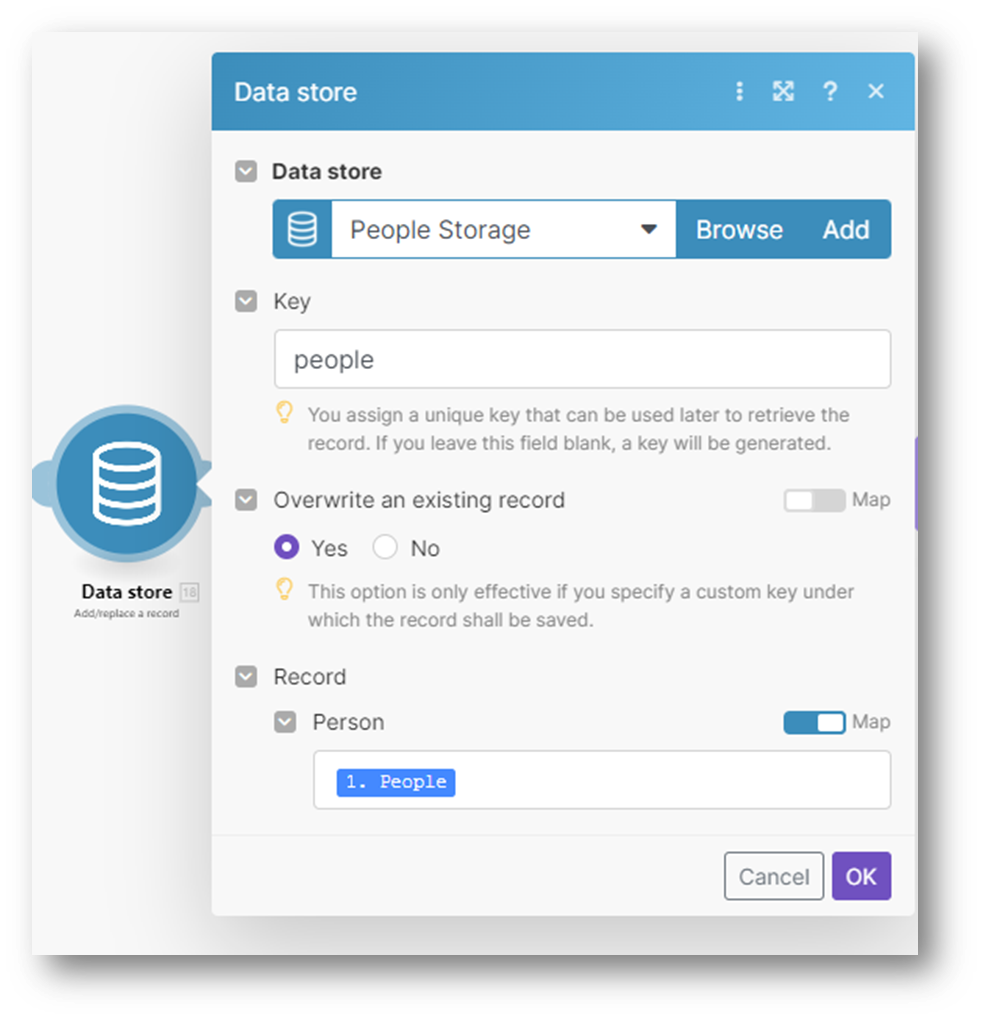
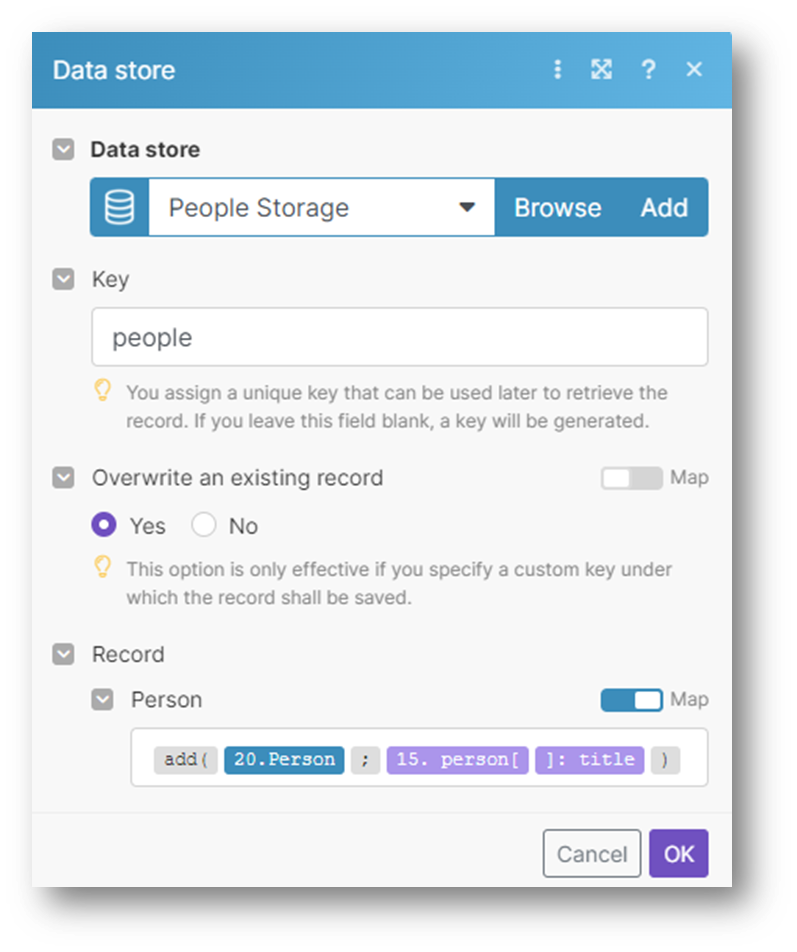
Create the data store early in your scenario, then use it when interacting with your Linked Record values. You can update the data store’s value to include additional values in a way that is very similar to the single update we did earlier:
When you need to update the Linked Record, retrieve the value from the Data Store and use it in the record update.

I hope that these techniques are useful in your own SmartSuite / Make.com scenarios. Please share your tips and tricks with the community - I’m interested to hear how you’re using Make in your own workflows!
SmartSuite provides work platform for standardizing workflows in the following areas:
- Governance, Risk & Compliance
- IT & Service Ops
- Project / Portfolio Management
- Business Operations


